

Translate this page into:
Collection and processing of effusion fluids for cytopathologic evaluation

-
Received: ,
Accepted: ,
How to cite this article: Shidham VB and Epple J. Collection and processing of effusion fluids for cytopathologic evaluation. CytoJournal 2022;19:5.
Abstract
Accumulation of fluid in serous cavities as effusions may have to be drained for therapeutic and diagnostic indications. As compared to many other procedures, the technicality of paracentesis procedures is relatively easy. As a result, effusion fluids comprise a significant proportion of specimens in most of the laboratories, including those in community settings.
Because of relative complexities in the cytopathologic evaluation of effusion fluids, application of appropriately standardized protocol is critical for achieving optimum results by applying standardized steps from handling of specimens during the initial stages of collection to the final interpretation phase. Understanding various limitations and challenges during collection and processing phases by all the personnel involved, including clinicians, pathologists, and technologists is critical for optimum diagnostic yield.
This review highlights various cytopreparatory techniques applicable to effusion cytology in one place. It is organized by projecting the details predominantly in the form of different tables and figures including summary of the recommended protocols with reagents and stains used. Also included is a sample of cytopathology report based on the approach discussed in this series.
Keywords
Serous cavity
effusion fluid
collection
specimen
processing
cytopathology
cell-block
cellblock
staining
fixation


Serous effusions are relatively easy to drain and collect for therapeutic and diagnostic purposes. Consequently, they form a significant proportion of specimens, even in general pathology laboratories. However, the cytopathologic evaluation of these effusions is relatively complex and requires proper handling of specimens from the initial stage of collection to final interpretation [Table 1]. The personnel involved in the process, including clinicians, pathologists, and technologists, should be familiar with the proper collection and processing of effusion specimens for optimum diagnostic yield.
| Collection | Fresh without anticoagulant OR Fresh with anticoagulant- Heparin¶[1-16-17] Acid citrate dextrose[16] Di-sodium EDTA[18] *OR (rarely if delayed transport or storage at higher room temperature cannot be avoided) The specimen may be collected in: 50% ethanol in 1:1 proportion Liquid-based fixative-transport medium SurePath-CytoRich Red Solution[19] ThinPrep-CytoLyt Solution[20] |
| Submission | With clinical details |
| Storage | At 2-8°C without freezing (may be stored for 72 hours, or even up to 1 week)[21] |
| Initial processing | Process as early possible after receiving the specimen: a.If the specimen shows clot formation, remove the clot(s). b.Separate any fluid within and around the clot by squeezing the clot against the side of the container with a spatula or tongue depressor. c.A firm rubbery clot is left. If the squeezed clot is big, transfer it to a petri dish and cut it into smaller pieces to allow it to be accommodated in a tissue-processing cassette d.Place the clot in 10% buffered formalin (as used for surgical specimens). Allow it to fix for 30 minutes or longer and process the clot for cell-block preparation e.After separating out the clot for cell-block preparation, agitate the remaining specimen to disperse the cells that may be at the bottom of the specimen container. Process the specimen according to individual laboratory protocol (Table 2). Note: If the sediment shows small fragments, process them for cell-block preparation [Table 10] |
¶Heparin may lead to background staining especially in smears stained with Romanowsky stains such as Diff-Quik (DQ).
This review (which will be Appendix I of the finally compiled CMAS#2) is a compilation of various cytopreparatory techniques related to effusion cytology, organized into different tables and figures following this introductory text. A summary of the recommended protocol practiced in our laboratory is shown in Table 2 with details of some reagents and stains used during effusion fluid cytopreparation in Table 9. A sample report, based on the approach discussed in this series, is also included as Table 11.
| Preparation | Purpose | Additional information | |
|---|---|---|---|
| A. |
DQ stained Direct smear
|
Semiquantitative evaluation of cellularity | A small aliquot of unconcentrated properly mixed effusion fluid (3 drops) is added with 22% bovine albumin (1 drop) A drop of this mixture is spread on a glass slide The smear is air-dried Stain with Diff-Quik [Table 6] |
| B. |
PAP stained Direct smear
|
Rapid initial detection of second population and cytomorphologic evaluation of hematopoietic cells | [Table 4, 6, Figure 12] Although with smaller area, Cytospin slides [Figure 12] or direct smear from sediments may be used instead of Megafunnel slides |
| C. |
PAP stained ThinPrep (Optional)
|
Cytomorphologic evaluation, especially nuclear details. | [Figure 1319] Depending on individual laboratory set-up and resources, other alternatives may be used [Table 5]: a. wet-fixed direct smears prepared by spreading a drop of cellular sediments1 b. wet-fixed Cytospin smear [Table 4, Figure 12], c. other LBC smears prepared by proprietary methods (such as ThinPrep20 or Liqui-PREP24) or other non-proprietary methods25 d. Filter method (rarely practiced)26-32 |
| D. |
Cell-block (Nano-NGCB kit)
|
Evaluation of- a. Immunoprofile, b. Other special stains, c. Architecture |
[Table 10, Figure 1533] a. If the requisition with the specimen mentions a diagnosis of or a history of cancer, we routinely prepare a cell-block b. If a cell-block is not prepared initially but the cytology smears suggest the possibility of malignancy, a cell-block is prepared from any residual specimen saved in the refrigerator c. If enough material is not available and a cell-block is indicated, a repeat specimen should be recommended for cell-block preparation d. Cell-blocks are routinely prepared from all peritoneal washings |
|
a. Direct smears (Spreading a drop of specimen directly on slide. The specimen may be before concentration * or after concentration as sediment) i. Wet fixed–PAP stain ii. Air-dried– Diff-Quik stain* PAP stain: after rehydration in saline and post-fixation in 95% ethanol with 5% acetic acid37 |
|
b. Cytospin smears (Shandon EZ Megafunnel™ with Shandon Cytospin38 i. Wet fixed–PAP stain ii. Air-dried– Diff-Quik stain [see Table 4] PAP stain: after rehydration in saline and post-fixation in 95% ethanol with 5% acetic acid37 |
|
c. Filters39-45 i. Wet fixed–PAP stain |
|
d. Liquid-based cytology (SurePath19or ThinPrep20or other non-proprietary methods24,25 i. Wet fixed–PAP stain* [Table 5] |
|
Principle When effusions are concentrated by conventional centrifugation, the cells may be distorted while being deposited and smeared onto the slide. During cytocentrifugation with Cytospin, the cells are sedimented directly onto a vertical slide while the suspension medium is absorbed by an absorbent paper ring |
|
Specimen collection To avoid clotting of effusions, EDTA or sodium citrate may be used as an anticoagulant. Heparin and potassium oxalate interfere with Romanowsky stains and are not recommended |
|
Procedure:[Figure 12] 1. Label the slide with patient identifier(s) 2. Open two Cytospin slide clips by swinging the metal wire down and away from the clip back and placing them on the counter with the wires towards you. 3. Place a slide (label side up and at the top) in a cytospin clip under a white blotter/sample chamber 4. Close the Cytospin clip by swinging the rectangular wire towards the Cytospin clip back, sandwiching the slide and blotter/sample chamber between the back and wire of the Cytospin clip and hooking both sides of the wire behind the metal hooks on the clip back. Check that the exit port in the sample chamber and the punch hole in the blotter are properly aligned 5. Place slide clip assemblies in opposite slits of the bowl 6. Add 22% albumin to the bottom of the conical sample chamber 7. Add specimen to the bottom of the sample chamber. For example: 5–8 drops for clear fluids 1–2 drops straight (or dilution) for cloudy fluids 8. Cap sample chambers to prevent aerosols 9. Replace the cover and return the sealed head to the cytocentrifuge. Close and lock the lid. Do not remove or replace the cover while the head is in the cytocentrifuge. 10. Set time, speed, and acceleration of cytocentrifuge: Time: 5 minutes Speed: 800 rpm Acceleration: Low 12. Press start and let the program cycle to completion 13. Remove and open slide clip assembly, being careful to lift the sample chamber and blotter up without smearing the area of cell concentrate 14. Circle the area of the cell concentrate with a felt tip marker on the back of the slide as a guide if the slide are not preprinted with an outline 15. Air-dry the slides (or wet-fixed in 95% ethanol prior to drying) 16. Stain air-dried Cytospin slides with Diff-Quik [Figure 2] or Hema-Quik II (Wright–Giemsa stain) or similar Romanowsky stain (such as Leishman stain, May–Grunwald, etc.) [Table 6]. Wet-fixed Cytospin smears could be stained with PAP stain. |
|
Specimen Each sample is different and must be handled individually according to volume received, specimen consistency, and clinical history. Cells from some neoplasms such as small cell carcinoma and high-grade lymphoma may be damaged and rendered unsuitable for cytopathologic assessment, if inappropriately collected and/or incorrectly processed. In general, moderate to large volumes of specimens (over 5 ml) should also be processed for a cell-block [Table 10, Figures 15-17]. |
|
Reasons for rejection/unsatisfactory results The specimen may be rejected or categorized as unsatisfactory under the following circumstances: •Thespecimencontainerisnotlabeledwiththepatient’snameand unique identifier •Thespecimenintegrityhasbeencompromisedby: Delayed arrival in the cytopathology laboratory Improper preservation or collection |
|
Procedure Subject to institutional and regional preferences, various methods are used for processing effusion fluids for cytology. A. Centrifugation to get sediment and preparation of direct smear from the sediments [Figure 11] B. Cytospin Preparation (Shandon Cytocentrifuge) [Table 4, Figure 12][38] C. Liquid-based cytology (LBC): a. SurePath (Becton, Dickinson and Company, Franklin Lakes, NJ, USA [Figure 3, 13][19] b. ThinPrep (Hologic, Marlborough, MA, USA [Figure 5, 14][20] c. Liqui-PRE LGM P[24](International, Inc., Fort Lauderdale, FL, USA) d. Any other alternative non-proprietary liquid based cytology methods25 D. Filter method (rarely practiced)[26-32] |
|
The main components of a Romanowsky stain are: a. A cationic or basic dye such as azure B. This binds to anion rich cellular structures such as nucleic acids (DNA or RNA) and nucleoproteins giving them a blue-grey color b. An anionic or acidic dye such as eosin Y. This binds to cationic structures such as proteins and gives them an orange-red color. Based on different combinations of these dyes numerous methods are available. A few examples described here include: A. Field’s stain or DiffQuik stain (E Merck) B. Wright–Giemsa single step stain C. May-Grunwald-Giemsa method D. Leishman method Any method, subject to regional and institutional preferences, may be used. But for reproducible staining quality, it is important to select uncontaminated dyes and reagents. Staining can be carried out in a jar or on a staining rack. In our laboratory we use Diff-Quick stain. |
| A. Field’s stain or Diff-Quik stain |
| The air-dried smears are fixed in absolute methyl alcohol and stained with two consecutive stain solutions. The fixative preserves the morphology of the cells and keep the cells in the smear adhering to the glass slide. The smears must be fixed as soon as possible after they have dried. It is important to prevent contact of cells with humidity prior to fixation. In humid climates replace the methanol periodically. Although absolute ethyl alcohol (ethanol) may be used, absolute methyl alcohol (methanol) is preferred. To prevent contamination of the fixative with traces of water, especially in humid climates, it must be stored in tightly capped container such as in screw-capped bottle. Methylated spirit contains water and cannot be used. Reagents i. Field’s stain (may be prepared in laboratory) (see Table 9F) a. Stain solution 1: pink-red color (Table 9F) b. Stain solution 2: blue color (Table 9F) OR ii. Diff-Quik stain kit (E Merck) a. Stain solution 1 (Eosin G in phosphate buffer): pink-red color b. Stain solution 2 (Thiazine dye in phosphate buffer): blue color Procedure 1. The smears are air-dried rapidly 2. Dip the slides five times, for 1 second each, into fixative. Allow excess to drain after each dip 3. Dip the slides five times,* for 1 second each, into Stain 1. Allow excess stain to drain after each dip 4. Dip the slides five times,* for one second each, into Stain 2. Allow excess stain to drain after each dip 5. Rinse the slides in distilled water or phosphate buffer, pH 6.8 6. Blot or allow the slide to dry in air 7. After dipping in xylol, mount with cover slip *The timings may vary. Follow manufacturer’s instructions for proprietary staining kits or standardize and establish individual laboratory timings Note: stain 1 can be topped periodically from the stock solution. However, due to contamination of stain 2 with stain 1 during staining procedure, stain 2 looses its quality and needs to be changed periodically. Alternatively, the slides may be rinsed in distilled water after staining with solution 1 and then dipped in solution 2. If this washing step is applied, solution 2 may also be topped up instead of discarding and refilling. |
| B. Wright–Giemsa single-step stain (such as HEMA-Quik II Stain, Fisher Scientific International) |
|
Reagents HEMA-Quik II Stain Solution Deionized water Storage Conditions (for the staining solution) i. Store at controlled room temperature ii. Keep the bottle tightly closed when not in use iii. Do not use the staining reagents after their expiration date |
|
Indications of Deterioration i. The presence of excessive precipitate in the stain solution or on the stained slides ii. Inadequate differentiation of cell types in stained smears Procedure Single Slide dip technique: 1. Transfer approximately 50 mL of the staining solution into a container (Note: Do not return used stain to the stock bottle; this may adversely affect the performance of the remaining solution) 2. Immerse the slide in the stain for 10 to15 seconds 3. Immerse the slide in 250 mL deionized water for 15–30 seconds 4. Rinse the slide by dipping it into 250 mL of fresh deionized water for few seconds, shake off excess water and let the slide stand to air dry Slide flooding technique: 1. Place the slide on a staining rack 2. Pipette about 1.0 ml of the staining solution onto the slide 3. Let it stand for 10 to 15 seconds and then drain excess stain from slide 4. Immerse the slide in 250 ml of deionized water for 15 to 30 seconds 5. Rinse the slide by dipping it into 250 mL of fresh deionized water for a few seconds 6. Shake off the excess water and let the slide stand to air dry Multiple Slide Dip Technique 1. Transfer approximately 50 ml of the staining solution into a stain container 2. Dip the slide carrier holding the slides three times into the staining solution and then let it stand in it for 10 to 15 seconds 3. Drain off excess staining solution and dip the slide carrier into 250 ml of deionized water for 15 to 30 seconds 4. Transfer to 250 ml of fresh deionized water for 1 minute 5. Remove the slide carrier and drain off any excess water 6. Allow slides to air dry. Notes: a. Eosinophilic staining (red tone) may be intensified by dipping the slides for up to 30 seconds in staining solution. Basophilic staining (blue tone) may be intensified by dipping the slides for up to 60 seconds or more in to the first deionized water container b. Fresh deionized water should be used for each run c. After dipping them in xylol, the dried slides may be coverslipped and mounted with mountant |
| C. May-Grunwald-Giemsa method(for reagents see Table 9G) |
| 1. Fix the air-dried cytology smear in absolute methyl alcohol (methanol) for 1 minute 2. Stain for 15 minute in working Jenner solution (Table 9G-aii) freshly diluted with an equal volume of buffered distilled water, pH 6.8 3. Stain for 10 minutes in working Giemsa stain (Table 9G– aii) freshly diluted with buffered distilled water, pH 6.8 4. Wash in running tap-water and then leave for 3–4 minute in buffered distilled water, pH 6.8 5. Allow to dry and mount with a coverslip using a mounting medium such as DPX. |
| D. Leishman method(for reagents see Table 9H) |
| 1. Flood the air-dried cytology smear with undiluted Leishman stain (Table 9H) for 1 minute. Since the stain formulation includes methanol, this will fix the cells 2. Dilute the stain on the slide with an equal amount of buffered water, pH 6.8, adding the water slowly with a plastic Pasteur pipette and mixing by sucking the stain up and down with the pipette or by gently rocking the slide 3. Leave the slide for 9 to 12 minutes or the time recommended by the manufacture or the time standardized by the individual laboratory; the appearance of a polychromatic ‘scum’ on the surface of the slide is merely a result of oxidation of the dye components and can be ignored 4. Wash off excess stain with slowly-running tap water and flood slide for one minute with buffered water, pH 6.8 5. Dry the slide and mount with a coverslip using a mounting medium such as DPX. |
|
Stained wet filmsare simple to prepare and are ready for immediate evaluation.1A 5.0 ml aliquot may be processed immediately for the ‘toluidine blue stained wet film technique. This initial evaluation may assist in proper triage of the effusion fluid specimen for microbiology, immunocytochemistry, cell biology, flow cytometry, cytogenetics, etc. As highlighted by Dr. Naylor (personal communication) advantages include: a. Most effusion fluids show distinct cytologic features allowing diagnostic interpretation within 10–15 minutes of the specimen reaching the laboratory b. In addition, stained wet films may reveal certain entities that are not seen in the permanent smears, such as cholesterol crystals, Charcot Leyden crystals, hematoidin crystals, detached ciliary tufts, etc. However, most of these entities can also be seen in Diff-Quik stained preparations c. Wet film allows initial rapid evaluation facilitating proper triage of the specimen at an earlier stage prior to clotting of the sediment for preparation of the cell-block Procedure 1. Transfer a drop of the topmost layer of the sediment of unfixed specimen without anticoagulant obtained by centrifugation with a microbiology wire loop to the center of a glass slide 2. Add about an equal volume of toluidine blue stain (Table 9C) next to the drop of the sediment 3. With the corner of a coverslip mix the two drops and place the coverslip over the mixture. The stained wet film can be examined immediately and discarded after evaluation. Permanent smears made immediately after examining the wet film always contain the same cellular component. Therefore, discarding the wet film does not preempt accurate diagnosis |
Note: The wet film can be preserved for photography, teaching, etc., if kept in a covered petri dish containing a piece of gauze or filter paper moistened with tap water. The slide should be kept off the wet gauge by using a wooden applicator stick bent to a ‘V’ shape. The slide should be refrigerated. Such preparations may be preserved for years if the edge of the coverslip is sealed with nail polish.
|
Reagents Phosphate buffer saline(PBS) 4.3 mM Sodium phosphate, dibasic (Na2HPO4) pH 7.2 2.7 mM Potassium chloride (KCl) 1.8 mM Potassium phosphate, monobasic (KH2PO4) 137 mM Sodium chloride (NaCl) Ficoll–Hypaque Solution of Polysaccharide (5.7% w/v)–Sodium Diatrizoate (9.1% w/v) Density 1077 ± 0.001 g/ml; osmolality 280 ± 15 mOsm Venders such as: a. Amersham Pharmacia Biotec Inc., Arlington Heights, IL, USA b. Lymphoprep, Axis-Shield PoC AS, Oslo, Norway This reagent is stored in refrigerator. But it should be equilibrated to room temperature prior to its use by incubating it in 15 ml aliquots at room temperature Procedure a. Layer 30 mL of effusion fluid onto 20 mL Ficoll–Hypaque b. Centrifuge at 1550 rpm for 30 minutes at room temperature c. Aspirate and discard the supernatant with fine tip Pasteur pipette d. Carefully collect the interface and transfer into a clean tube e. Fill the tube with PBS f. Centrifuge at 1550 rpm for 10 minutes g. Wash the pellet with PBS h. Use the washed pellet for further cytopreparatory processing (Tables 3, 5) |
|
A. Tinted formalin Add a small amount of eosin powder to 10% formalin. This tinted pink-orange formalin may be used to fix the cell block material. Tinted formalin does not interfere with the final microscopic appearance of the HE stained material. |
|
B. Thrombin solution 5000 units of powdered thrombin in 10 mL of distilled water. |
|
C. Toluidine blue stain Toluidine blue (0.5 g) 95% ethanol (20.0 mL) Distilled water (80.0 mL) Store in the refrigerator to prevent fungal growth |
|
D. Dithiothreitol (DTT) as mucolytic agent •Sputolysin (Calbiochem,LaJolla,CA,USA)– Sterilesolutionof DTT in the concentration of 6.5×10⁻³ mol/liter (1 mg/mL) in sodium phosphate buffer pH 7 •Dilute10-foldtoget100μg/mlworkingconcentration.Thishas to be stored on ice until used. Prepare fresh every day •Usewithequalvolumeofmucinrichspecimentogetfinalconcentration of 50 μg/ml |
|
E. 2% agar with 0.1% sodium azide Add 2 g of bacterial agar powder and 0.1 g sodium azide as a preservative to 100 mL saline in flask. Boil the mixture until the agar powder gels and the final mixture is clear. For easy multiple use, the final clear molten agar may be aliquoted in small tubes and stored in the refrigerator without freezing |
|
F. Reagents for Field’s stain (Diff-Quik type 3 jar staining) Stain solution 1 (Pink) Eosin Y …………………………………… : 2.0 g Disodium hydrogen phosphate anhydrous : 2.6 g Potassium dihydrogen phosphate ….…… : 2.6 g Dissolve in distilled water …….………… : 1.0 L Filter and store. Stain solution 2 (Blue) Methylene blue ……………………….… : 1.6 g Azure 1 ……………………………….… : 1.0 g Disodium hydrogen phosphate anhydrous: 2.6 g Potassium dihydrogen phosphate …….… : 2.6 g Dissolve in distilled water …………….… : 1.0 L Place in a flask and warm in a water bath for 30 minutes. Leave for 24 hours at room temperature. Filter and store |
|
G. Staining solutions for May–Grunwald-Giemsa method ai. Jenner Solution (stock) Jenner stain powder 1 g Methyl alcohol 400 ml aii. Jenner Solution (working): Jenner solution (stock) 25 ml Buffered distilled water 25 ml bi. Giemsa solution (stock): Giemsa powder 1 g Glycerin 66 ml Methyl alcohol 66 ml Mix glycerin and Giemsa powder. Place in 60°C oven for 2 hours. Cool and add methyl alcohol bii. Giemsa solution (working): Giemsa solution (stock) 50 drops Buffered distilled water 50 ml |
|
H. Leishman stain Dissolve 1 g Leishman stain powder in 500 ml methanol Incubate overnight at 37°C Filter through qualitative grade 1 Whatman paper Store at room temperature in a screw-capped bottle |
| A. Protocol for cell-block from specimen with a significant sediment |
| (For specimens with lesser amount of sediments, use other methods) 1. The specimen is transferred into a 50 ml centrifuge tube, labeled with the specimen identifier 2. Spin for 5 minutes at 3000 rpm 3. Label a tissue cassette with the cytology accession number 4. Place a 2 inch × 2 inch piece of lens paper inside the bottom of the tissue cassette 5. Remove the centrifuge tube, decant the supernatant, and add about 1 ml of 10% tinted formalin (Table 9A), and spin again for 5 minutes at 3000 rpm. 6. If a scanty pellet is formed, HistoGelTM (see below) may be used 7. Remove the pellet with a pointed spatula and place on top of the lens paper inside the tissue cassette 8. Fold the lens paper gently over the pellet. With pellet wrapped in paper, snap the top cover of tissue cassette to close it 9. Drop the cassette into 10% tinted formalin (Table 9A) and process for paraffin embedding |
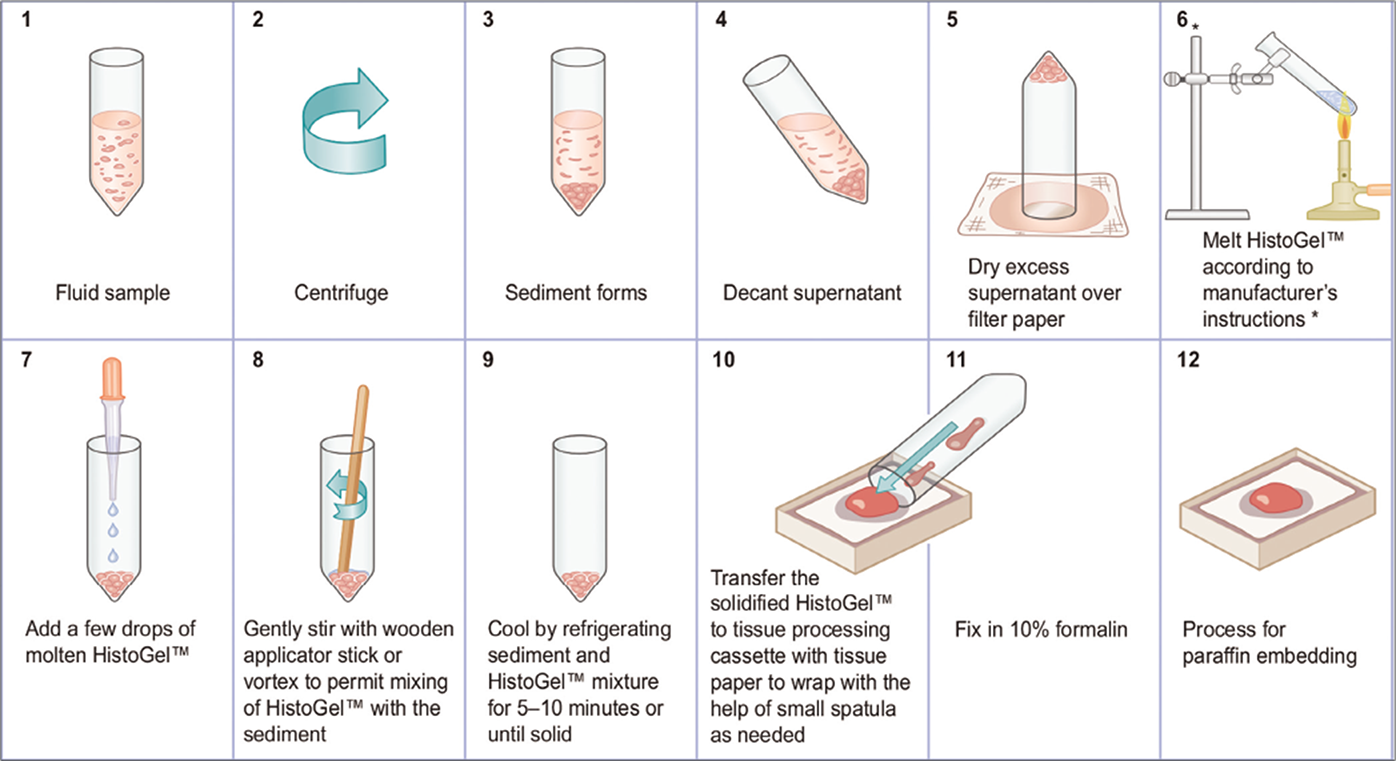
| B. Protocol for HistoGelTM method [Figure 15] |
| The claims for HistoGelTM Specimen Processing Gel (Richard- Allan Scientific, Kalamazoo, MI, USA) highlighted by the manufacturer are: ‘Small, friable, or viscous histology or cytology specimen will be surrounded by HistoGelTM which will retain the entire specimen during histological processing. HistoGelTM outperforms other agarose gel mixtures or thromboplastin. It does not retain histological stains and eliminates unwanted discoloration around specimens on slides (Figure 6). It is virtually unnoticeable during sectioning and will not “pop out” of the paraffin block during cutting. If the specimen is already in formalin or an alcoholic fixative, the performance of the gel is not affected if most of the supernatant fluid is removed prior to adding HistoGelTM.[33] |
|
Procedure: 1. If the pellet formed during centrifugation is too scanty or not solid enough, HistoGelTM may be used to help keep the tissue together for cutting in histology 2. After the second centrifugation spin, determine visually if the sample is too small to be added to the cassette 3. Place a small amount of HistoGelTM with a small spatula and heat in other tube for about 1 minute or until it melts completely 4. Let it cool to the temperature sufficient to maintain HistoGelTM in molten state but not too hot to destroy the tissue (the tube could be comfortably touched to the back of the hand) 5. Add 1–2 drops of molten HistoGelTM to the specimen pellet/ tissue fragments in a flat-bottomed centrifuge tube. If the pellet contains a lot of water, the gel may be diluted and solidification of the gel may be delayed or incomplete 6. Mix by vortexing or with wooden applicator stick 7. Place the centrifuge tube with its pellet mixed with HistoGelTM into a refrigerator for 5–10 minutes or until solid 8. With small spatula, carefully transfer the pellet embedded in the gel from the tube onto a lens paper inside the tissue cassette 9. Fold the lens paper gently over the pellet. With pellet wrapped in paper, snap the top cover of tissue cassette to close it 10. Drop the cassette into 10% tinted formalin (Table 9A) and process for paraffin embedding |
| C. Gelatin embedding49 |
| The procedure is same as for HistoGelTM; however, 2% molten gelatin is used in place of HistoGelTM |
| D. Agar embedding method |
| The procedure is same as for HistoGelTM except that 2% molten agar (Table 9E) is used in place of HistoGelTM |
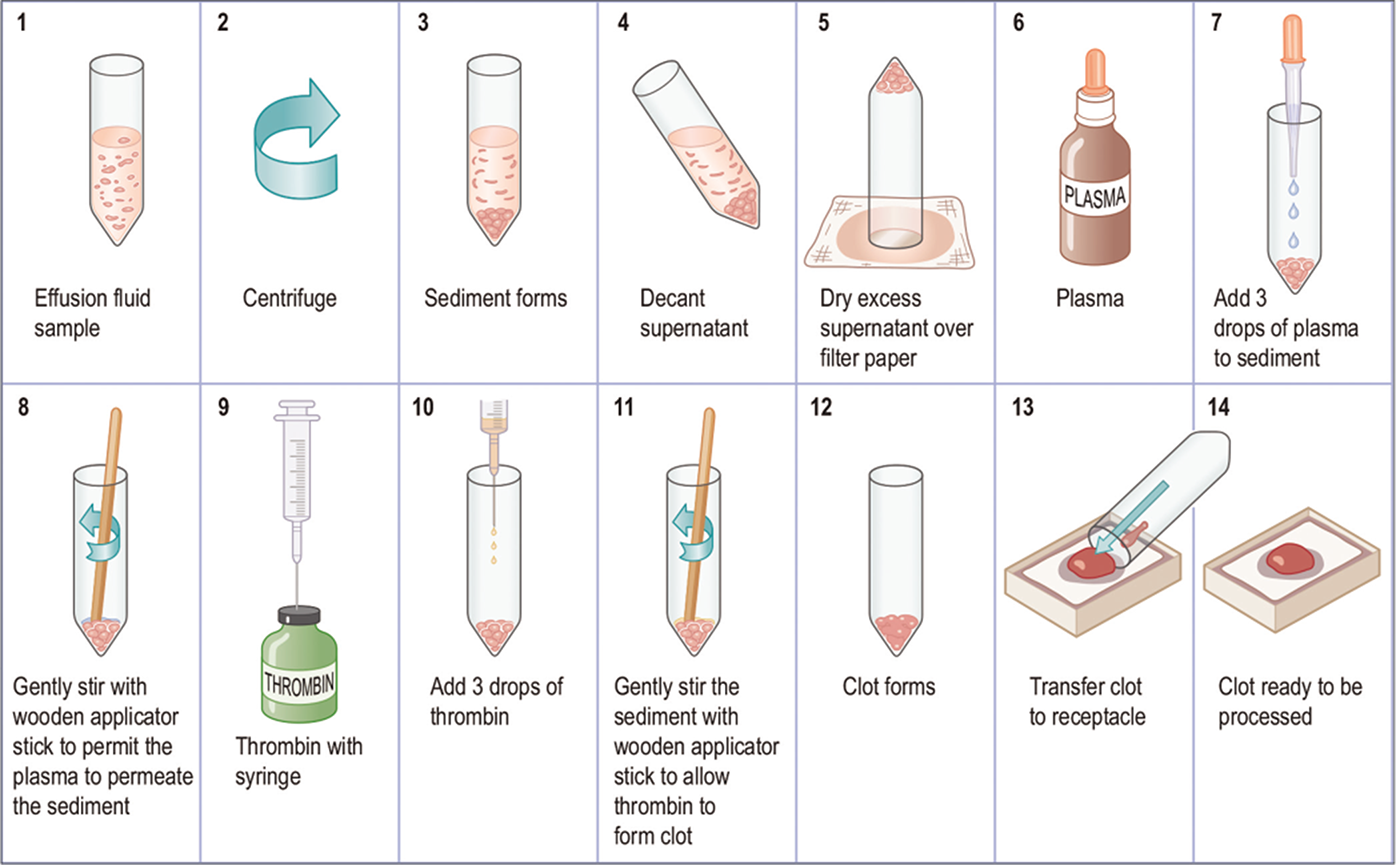
| E. Protocol for Plasma-Thrombin method (Figure 6)58,59 |
| If the sediment formed during centrifugation is too scanty or not solid enough it may be kept together for a cell-block by the plasma-thrombin method.[59] In general, this method may, however, be used for any type of effusion specimen irrespective of the amount of the sediment. Plasma (pooled plasma from a blood bank may be used) and thrombin (1000 NIH U per mL) are used to prepare the cell block. The stability of the reagents may be checked periodically by adding two drops of thrombin solution to two drops of plasma, which should clot in about 30 seconds. Procedure: a. Mix 2–3 drops of plasma with the sediment b. Add 3–4 drops of thrombin solution (5000 units in 10 ml distilled water) [Table 9B] and mix c. The mixture usually clots in a few seconds d. Once the clotting is complete, add tinted 10% buffered formalin [Table 9A] e. Dislodge the clot from the tube and let it fix in formalin for 30 minutes f. Process this clot similar to any tissue processed for histologic examination Notes: i. Spontaneous clot is not expected if the effusion fluid was collected with anticoagulant. ii. The anticoagulant in the pellet may have to be neutralized with a suitable concentration of calcium chloride. iii. If the effusion specimen is collected in fixative, the plasma-thrombin technique is not effective unless the cell button is thoroughly washed with isotonic protein solution prior to be adding the plasma and thrombin. |
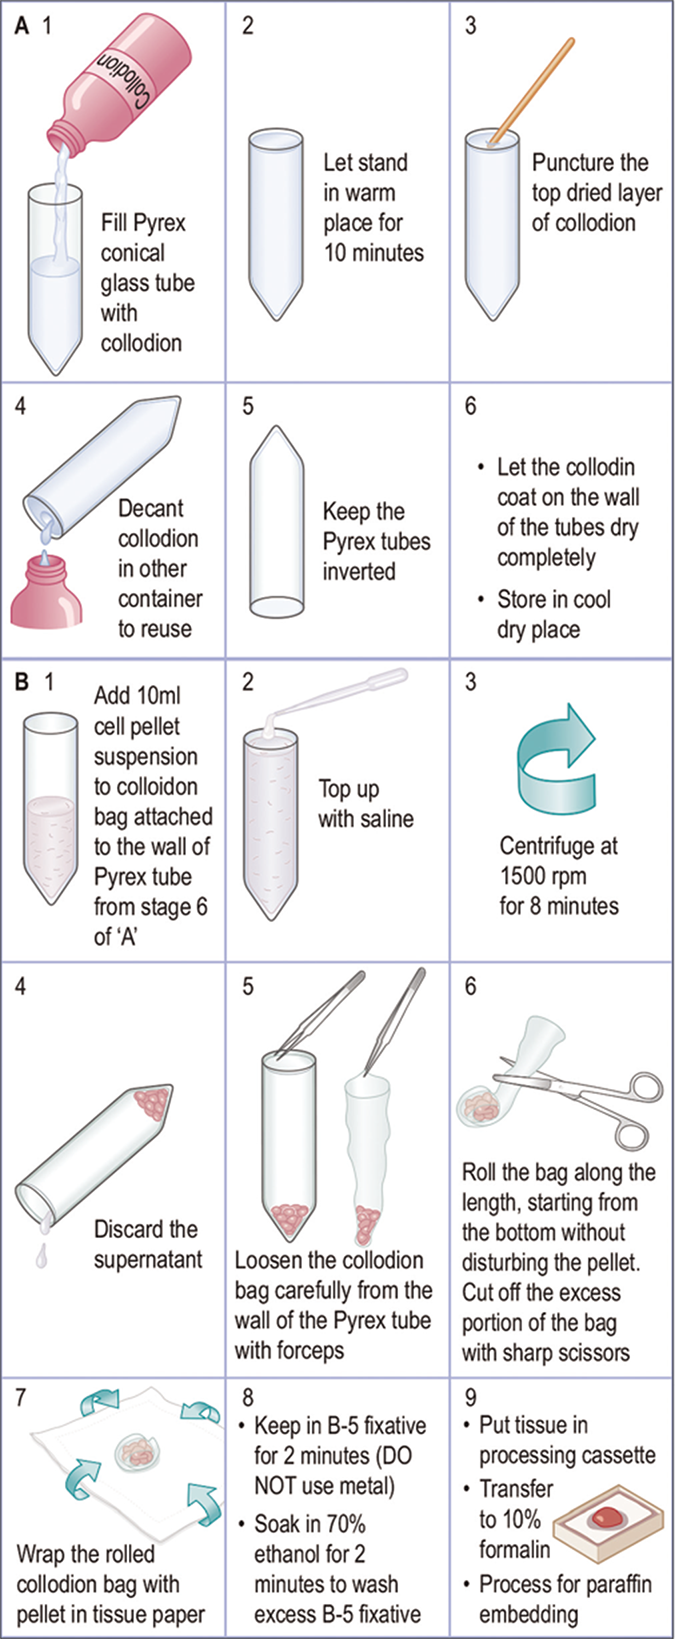
| F. Cell-block preparation using collodion (Celloidin) bag [Figure 17]60,61 |
|
Preparation of collodion bag Collodion tubes are prepared in 15 ml, 17X120 inch, Pyrex conical tubes (Corning 8060, #05-505, Fisher Scientific, Pittsburgh, PA) and Collodion Flexible USP (Mallinckrodt, #4580-500-NY, Baxter Scientific, McGraw Park, Ill). Collodion bags are prepared under a vertical fume hood as follows: 1. Place 15 ml Pyrex conical tubes in a rack under a vented fume hood 2. Gently add collodion to 15 ml Pyrex conical tubes in the rack and fill to the top 3. Let the collodion stand for 10 minutes. The thickness of the final collodion bags depend on the timing of this step and the initial consistency of the collodion reagent 4. Puncture the hardened surface of the collodion at the top of the tube with a wooden applicator stick 5. Pour the collodion solution back into the bottle 6. Drain excess collodion by placing the tubes upside down in the rack. Let the tubes dry. The tubes may become cloudy, but this clears after drying 7. The tubes may be stored upside down in a cool, dry location (can be stored this way for 6–8 weeks) Note: Collodion may be reused until the final bags are noticeably thicker enough and difficult to fold around the cell pellet during the cell block procedure described below. |
|
Cell block preparation Material required •50mlFalconcentrifugetube(BectonDickinson,LincolnPark,NJ) •15mlcollodion-coatedconicalPyrexglasstube •Tissuecassetteswiththeirlids •Tissuepaperforwrappingthecellblock Procedure: 1. Pour 10 ml of concentrated specimen as a resuspended cell pellet into a 15 ml conical collodion tube. Rinse the tube with normal saline solution to recover all of the tissue in the transfer tube. Fill the conical collodion tube nearly to the top with the saline solution 2. Centrifuge the tube at 1,500 rpm for 8 min 3. Remove as much of the supernatant as possible with pipette without disturbing the cell button 4. Carefully remove the collodion sac with the help of pointed tip forceps from the tube wall by peeling it away gently and gradually from the sides of conical tube. The bag usually comes loose quite easily. Avoid disturbing the cell button by jerking it out too much 5. Cut off excess portion of collodion bag above the cell button without disturbing the cell button 6. Fold the bag as close to the cell button as possible 7. Wrap the folded bag in piece of tissue paper and place in B-5 fixative for 2 minutes 8. Remove from B-5 fixative (DO NOT use a metal appliance to do this). 9. Place in labeled plastic tissue cassette 10. Soak in 70% ethanol for 2 minutes to rinse off excess B-5 fixative 11. Transfer the cassette to 10% formalin for further processing for paraffin embedding Note: Exposure of tissue to B-5 fixative and alcohol prior to formalin fixation may interfere with the immunoreactivity of the cells in the cell block. |
| G. Cell block preparation from scraped material from cytology smears |
| If indicated, the material on cytology smears (stained or unstained) may be scraped off and processed for cell block.[74]However, depending on the exposure of the cells in such smears to various fixatives and reagents, the immunoreactivity pattern of such cell blocks may not be comparable to those with formalin fixed specimens |
| H. Cell block preparation from Millipore filters75 |
| Cytology specimens have been concentrated by membrane filters. A portion of PAP-stained Millipore filter (Millipore Corp, Bedford, MA) preparation could be processed for preparation of paraffin block. The filter may be retrieved from the slide, cut in two halves, and processed for routine paraffin embedding after post-fixation in 10% neutral-buffered formalin. The technique offers good results even with poor to moderately cellular specimens.[75]The technique could be used for fresh specimen or on archival filter slides. |
| I. Nano NextGen CelBloking™ (NGCB) kit (Modified from 57)[63-65] |
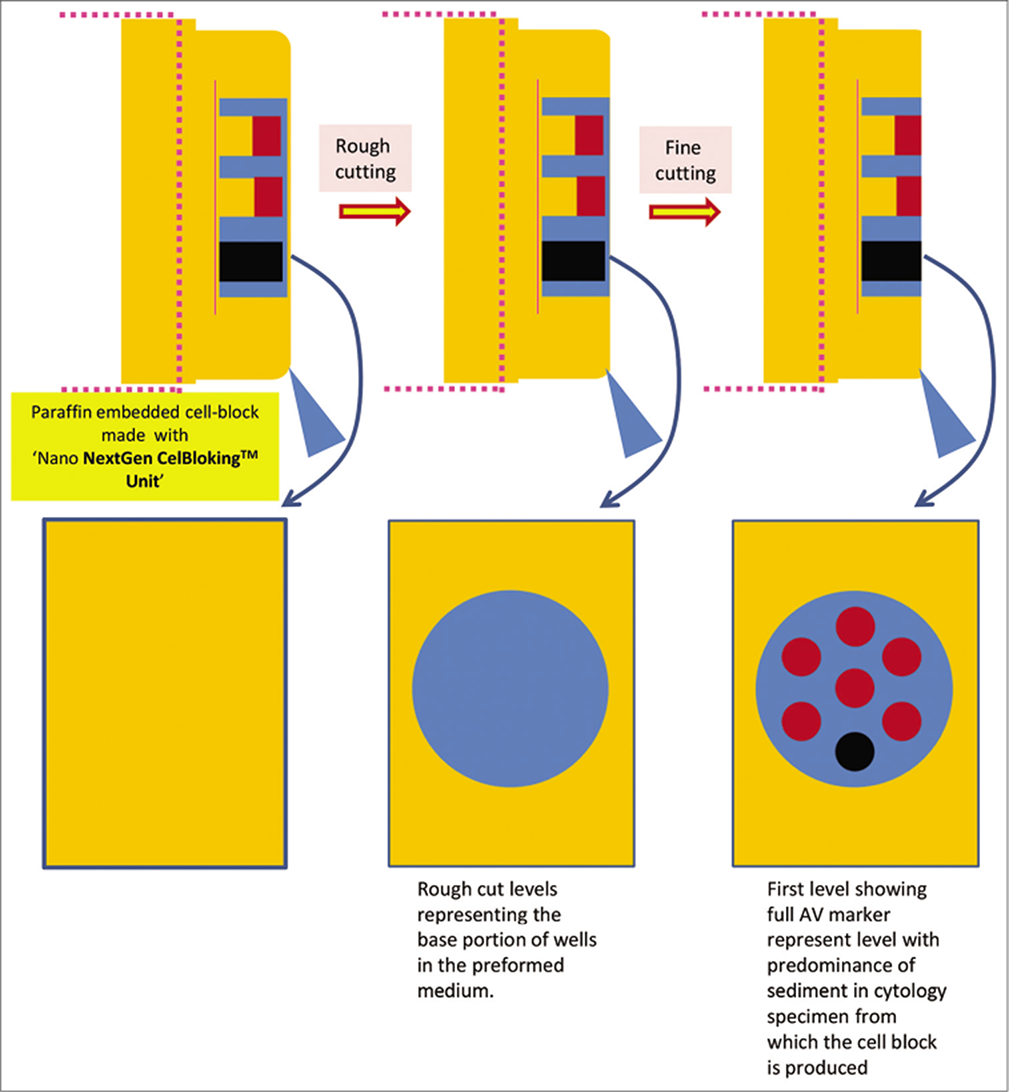
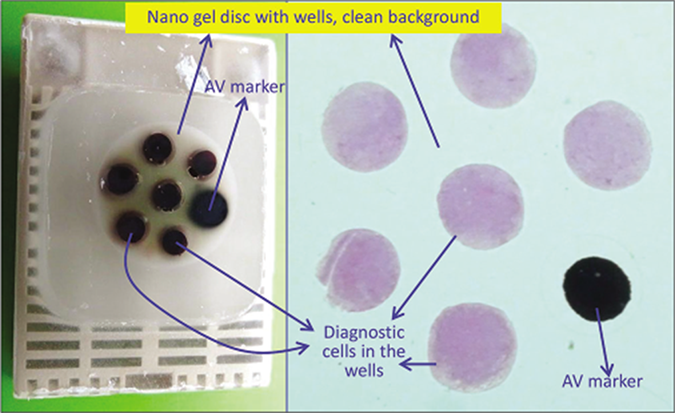
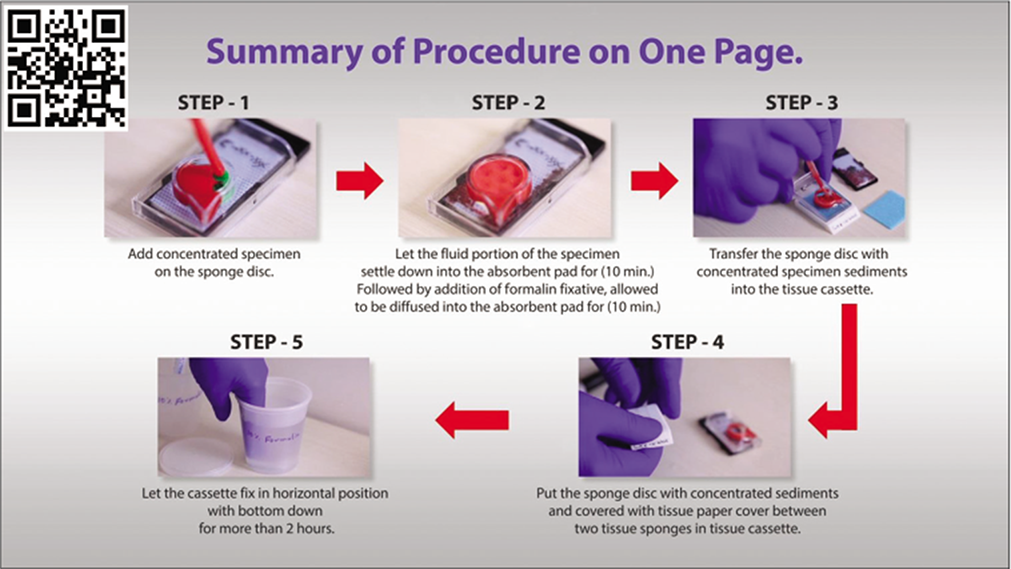
| Uses preformed gel discs with wells for the accumulation of sediments (proprietary Nano NextGen CelBloking™ kits (Nano-NGCB kits). (kits based on Shidham’s method with builtin precisely set dark AV marker) [Figures 18, 25-29][76] Nano version for specimen of any cellularity. For videos showing the methodology in detail are available free at One specimen at a time https://youtu.be/y29SS1NwO_8 Multiple specimens simultaneously https://youtu.be/ZPb0nq8MsLk a. Prepare concentrated sediment button by spinning enough quantity of specimen by centrifuging for 3 minutes at 2500 rpm b. Pool all the sediments as final concentrated sediment with maximum Cytocrit/Tissuecrit and resuspend the sediment. c. Nano kits[50,51] could be used for specimens generating final concentrated specimens with any cellularity. (At this stage, if the final concentrated specimen is >1 ml and has >50% Cytocrit/Tissuecrit then Micro version of the NGCB kits may be used [Figure 18]In case of doubt, it is recommended to choose Nano units for optimum results.) d. Open the caps of the Nano units.[69,71] Discard the transport fluid provided in the labeled Nano-NGCB kit unit by inverting the unit into the discard container. Add the concentrated suspension** in the Nano unit with preformed gel medium with wells at the bottom of the Nano-NGCB kit unit e. Centrifugeϯ the Nano unit for 3 minutes at 2500 rpm to sediment the celltissue components in the concentrated sediment suspension in the wells of the preformed gel medium at the bottom of unit f. Remove the tubes from centrifuge and discard the supernatant gently by inverting the contents into the discard container after opening the bigger top cap. g. Add a few drops (up to 1 ml) of 10% formalin gently along the wall of the Nano unit to cover the partially compacted sediments without disturbing the compacted sediments in the gel disc wells (other fixative or reagent applicable to the individual protocol may be used instead of 10% formalin) h. Centrifugeϯ the Nano unit again for 3 minutes at 2500 rpm to sediment the cell/tissue components in the concentrated sediment suspension in the wells of the preformed gel medium at the bottom of the unit i. Remove the tubes from centrifuge and discard the supernatant gently by inverting the contents into the discard container after opening the bigger top cap j. Prepare to dislodge the bottom gel disc from the unit by gently opening the small lower cap by twist opening it counterclockwise (see the arrows on the small lower cap)[70] k. Dislodge the gel medium disc (with wells which are now filled with sedimented cell/tissue components in the concentrated sediment suspension) by gently pushing it with the tip of transfer pipette used for that specimen into the center of labeled tissue cassette with formalin soaked tissue sponge along the bottom. Avoid the wells of the disc to be poked in by the tip of the transfer pipette. Instead push at the periphery. The top surface of the gel disc with mouths of the wells would face up l. Cover the top of the wells with sediments in the gel disc with tissue paper cover provided with the kit.[73] This step minimizes the potential for cross contamination m. Then lay over this tissue paper cover, the second sheet of tissue sponge (moistened with 10% formalin) and close the labeled tissue cassette n. Transport the cassette horizontally with the bottom down in container with 10% formalin to process with the protocol for paraffin embedding after fixing in 10% formalin for at least 2 hours (or for more duration as required by individual laboratory/institution protocol) o. The processed gel/sponge disc (with sediments in the wells) is embedded along with lens paper in such a way that the bottom of the discs corresponding with the bottoms of the wells will be the cutting surface in the paraffin block (and top surface with mouths of the wells covered with lens paper is deep in the paraffin block) [Figure 26][49] p. Rough cut the paraffin blocks until the dark-colored dot of AV marker is seen on the paraffin section (this is the level at which the constituent cells in the specimen have aligned) [Figure 27][49] q. Then, cut the block as usual (preferably only one level at which the AV marker is initially visible). Additional levels may be cut later as indicated for elective studies after studying the HE stained initial level [Figure 29] with reference to clinical details and findings in cytology preparations [Figure 23]. For the summary of the procedure see Figure 25. **If the specimen has a significant proportion of blood contamination as compared to the diagnostic celltissue component, then treat the blood contaminated concentrated specimen with lysing reagent (ammonium chloridebased lysing reagent similar to that used for flow cytometry so that immunohistochemistry results are not affected [Figure 20-22]. Acetic acidbased lysing reagents may compromise results of ancillary tests such as immunohistochemistry and should be avoided. |
| Mix the working lysing reagent with blood contaminated concentrated specimen and let the lysis be completed by keeping at room temperature for up to 10 minutes. Then centrifuge the mixture with lysing reagent for 3 minutes at 2500 rpm to sediment the celltissue components in the concentrated sediment suspension. Discard the supernatant with lysed red blood cells and use the sediment with concentrated nucleated diagnostic cells to make the cellblock by adding to the Nano unit [Figure 22]. ϯThe centrifuge used should have free swiveling rotor (NOT fixed angle) with cups for 50 ml tubes. If this is not available, the centrifugation step may be replaced by gravity sedimentation by leaving the units undisturbed for 30 minutes during these steps in the refrigerator (do NOT allow to freeze). Then gently discard the supernatant with the help of transfer pipette (instead of just inverting the unit after centrifugation), because the aggregation of the sediments may not be compact by gravity alone |
| J. Micro NextGen CelBlokingTM (NGCB) kit (Modified from 57)[63-65] |
|
Only for cellular specimens Uses preformed sponge discs with wells for the accumulation of sediments (proprietary Micro NextGen CelBloking™ kits (kits based on Shidham’s method with builtin precisely set dark AV marker) [Figures 18,30-34][35] If the final concentrated specimen is >1 ml and has >50% Cytocrit/Tissuecrit then Microversion of the NGCB™ kits may be used. For videos showing the methodology in detail are available free at One specimen at a time https://youtu.be/iZpXaljiIs Multiple specimens simultaneously https://youtu.be/TRW5Vswy6J8 a. Prepare concentrated sediment button by spinning enough quantity of specimen by centrifuging for 3 minutes at 2500 rpm b. Pool all the sediments as final concentrated sediment with maximum Cytocrit/Tissuecrit and resuspend the sediment. c. At this stage, if the final concentrated specimen is >1 ml and has >50% Cytocrit/Tissuecrit then Microversion of the NGCB™ kits may be used [Figure 18].[52,53] (In case of doubt, it is recommended to choose Nano units for optimum results.) d. Flood the preformed sponge disc with wells and preset black AV marker of the Micro unit with 0.5 to 1 ml of concentrated specimen with more than 50% Cytocrit/ Tissuecrit (if needed it may be done multiple times till all the wells are loaded and filled to the top with the sediments) [Figure 24] Micro NGCB units generally are not suitable for blood rich specimens**, which should be used after lysing the contaminant red blood cells (RBCs) in the specimen to get the RBC-free concentrated specimen to be cellblocked with Nano units e. Wait for 10 minutes to let the supernatant in the concentrated specimen be adsorbed into the absorption pad of the unit and the sediments get concentrated and flattened in the wells of the sponge disc |
| f. Add a few drops of 10% formalin gently over the Microsponge disc with concentrated specimen sediments in the wells (other fixative or reagent applicable to the individual protocol may be used instead of 10% formalin) h. Wait for 10 minutes to let the 10% formalin flooded over the concentrated specimen be adsorbed into the absorption pad of the unit and all of the added formalin is adsorbed into the absorption pad g. Dislodge the sponge medium disc (with wells which are now filled with sedimented celltissue components in the concentrated sediment suspension) by gently pulling out the black carrier plate with absorption pad of the Micro unit. If needed, the sponge disc may be pushed down with the tip of transfer pipette used for that specimen into the center of labeled tissue cassette with formalin soaked tissue sponge along the bottom. The top surface of the sponge disc with mouths of the wells should be facing up h. Cover the top of the wells with sediments in the gel disc with tissue paper cover provided with the kit.[73] This step minimizes the potential for cross contamination i. Then lay over this tissue paper cover, the second sheet of tissue sponge (moistened with 10% formalin) and close the labeled tissue cassette j. Transport the cassette horizontally with the bottom down in container with 10% formalin to process with the protocol for paraffin embedding after fixing in 10% formalin for at least 2 hours (or for more duration as required by individual laboratory/institution protocol) k. The processed gel/sponge disc (with sediments in the wells) is embedded along with lens paper in such a way that the bottom of the discs corresponding with the bottoms of the wells will be the cutting surface in the paraffin block (and top surface with mouths of the wells covered with lens paper is deep in the paraffin block) [Figure 31][49] l. Rough cut the paraffin blocks until the darkcolored dot of AV marker is seen on the paraffin section [Figure 32][49] m. Then, cut the block as usual (preferably only one level at which the AV marker is initially visible). Additional levels may be cut later as indicated for elective studies after studying the HE stained initial level [Figure 34] with reference to clinical details and findings in cytology preparations. For the summary of the procedure see Figure 30. ϯThe centrifuge used should have free swiveling rotor (NOT fixed angle) with cups for 50 ml tubes. If this is not available, the centrifugation step may be replaced by gravity sedimentation by leaving the units undisturbed for 30 minutes during these steps in the refrigerator (do NOT allow to freeze). Then gently discard the supernatant with the help of transfer pipette (instead of just inverting the unit after centrifugation), because the aggregation of the sediments may not be compact by gravity alone |
Note for I and J: The diagnostic cells accumulate focally in the wells of the gel / sponge disc [Figures 29, 34]. In the cell-block sections prepared using Micro version of NGCB™ kit, the cells may also be present in the spaces in the sponge disc [Figures 29, 34]. The gel disc medium in the cell-block sections prepared using Nano version of NextGen CelBloking™ kits is clear and do not show cells in the areas other than in the wells. The gel disc medium in the cell-block sections prepared using Micro version of NGCB™ kits may be stained as gray bluish sponge material with intervening spaces which may have diagnostic cells in addition to those concentrated in the wells [Figures 29, 34].
The precisely set, built in AV marker allows orientation of individual sections on the glass slides in identical fashion in serial order for proper application of SCIP approach, in addition to objectively guiding the histotechnologist for selecting the first level with diagnostic cells. This is especially important for immunohistochemical of cell blocks of relatively hypocellular specimens.
These methods also allow precise selection of wells with maximum cellularity for diagnostic material to be cored out with coring device similar to skin punch biopsy (trephine like) device. Such cores could be submitted as FFPE material for ancillary tests such as molecular testing.
| Patient Identification XXXXXXXXXXXXXXX Demographics XXXXXXXXXXXXXXX CLINICAL INFORMATION: Pleural effusion. History of breast carcinoma. SPECIMEN: Pleural fluid (Right) GROSS DESCRIPTION: 300 ml, serosanguinous, (fresh, unfixed) |
|
| SPECIMEN PROCESSING | |
| 1 DQ-stained direct smear of unconcentrated specimen 1 DQ-stained Cytospin smear 1 PAP-stained direct smear (and/or ThinPrep/SurePrep) 1 Cell-block (formalin-fixed without exposure to alcohol or other fixative prior to formalin-fixation) 1 HE-stained cell-block section slide 8 immunostained cell-block sections (7 test slides with corresponding positive controls and 1 negative control) |
|
| Non-GYN Cytology Report | |
| Pleural fluid, right (with cell-block): | |
| SPECIMEN ADEQUACY: - Adequate for interpretation |
|
| CYTOPATHOLOGIC INTERPRETATION: - Positive for malignant cells. - Consistent with metastatic carcinoma (see comment) |
|
| COMMENT: Atypical cells suggestive of second population are present with a few reactive mesothelial cells and a few mixed inflammatory cells |
|
| Immunostained cell-block sections showed: | |
| Two-color BerEP4 (Brown) with Vimentin (Red): | Demonstrated BerEP4 immunoreactive and vimentin non-immunoreactive second population of atypical cells (Reactive mesothelial cells and inflammatory cells in the background are vimentin immunoreactive) |
| GATA3 …………………………………………… : | immunoreactive (nuclear) |
| Estrogen receptors ……….……………………. : | immunoreactive (nuclear) |
| Cytokeratin-7 ……………….…………………… : | immunoreactive (A few reactive mesothelial cells are also immunoreactive) |
| Calretinin ………………………………………… : | non-immunoreactive (A few reactive mesothelial cells show nuclear and cytoplasmic immunoreactivity) |
| Cytokeratin-20 …………………………………… : | non-immunoreactive |
| The cytomorphology and immunoprofile are consistent with metastatic mammary carcinoma. | |
CPT: 88112, 88305, 88342, 88341X6
SAMPLING TECHNIQUE
Effusions are usually sampled by the relatively simple procedure in which a wide-bore needle, such as an 18-gauge needle, is inserted under local anesthesia through the body wall into the serous cavity.[1] The fluid is tapped under sterile conditions in its most dependent location. It is collected in a clean dry large container (such as a plastic bag, syringe, bottle, or other plastic container). If microbiologic culture is not expected [Table 1], the containers need not be sterile.
Abdominal paracentesis (usually referred to as paracentesis) refers to removal of peritoneal fluid, thoracentesis to removal of pleural fluid, and pericardiocentesis to removal of pericardial fluid.
Peritoneal washing
Peritoneal washing (peritoneal lavage, pelvic washing) is commonly performed for the staging of gynecologic cancers and, at times, to evaluate the spread of pancreatic and gastric cancers without gross evidence of peritoneal involvement. [2–4] Currently, increasing numbers of peritoneal washings are indicated in cases undergoing prophylactic ovarian and fallopian tube resections related to BRCA mutation. [5,6] It is performed by instilling physiologic saline solution into the peritoneal cavity, followed by withdrawal of the fluid, which is submitted for cytopathologic evaluation.
These specimens are processed in a similar manner to serous effusions, but their interpretation is based on slightly modified diagnostic criteria and cell-blocks are always prepared. Peritoneal dialysate is sometimes submitted for cytologic examination from patients with renal failure who are undergoing long-term peritoneal dialysis. The mesothelial cells in such dialysate may be associated with floridly reactive changes approaching atypia.[7]
Pleural lavage
Pleural lavage cytology has been performed for staging in lung and esophageal cancer patients without pleural effusion.[8-12] Patients with a positive pleural lavage are recommended to be staged higher.[8] The fluid is aspirated after instilling physiologic saline solution into the pleural cavity prior to the resection of the tumor.[8-10] Although defined morphologic criteria are not found in the literature, the cytopathology of pleural lavages should be evaluated similarly to those of cells in peritoneal washings, including the routine preparation of cell-blocks. Intraoperative touch cytology,[13] close pleural brushings,[15] and diaphragmatic scrapes[14] have also been performed for detection of serosal involvement by cancer.
COLLECTING AND TRANSPORTING EFFUSION FLUIDS
Up to 1000 mL of effusion fluid is transported to the laboratory as soon as possible after collection. If the specimen cannot be sent immediately to the laboratory or cannot be processed soon after submission, it may be stored in a refrigerator at 4°C; it should not be allowed to freeze. The effusion fluids, with its tissue culture medium type composition, are relatively better suited to maintain the integrity of its component cells. The use of anticoagulant or fixative depends on individual laboratory protocol [see Table 1]. However, the addition of fixatives to effusions is not recommended (see below).
Anticoagulants
The addition of heparin (3 units/mL of fluid) as an anticoagulant does not interfere with cytologic details,[1,16,17] but it may interfere with the quality of Romanowsky stains due to background staining. Anticoagulants such as acid citrate dextrose[16] and disodium EDTA[18,22,23] do not interfere with the cellular morphology. In addition, they are not associated with problems of background staining.
Fixatives
Although not recommended, fixatives or cellular preservative such as 10% buffered formalin, alcohol (ethanol, methanol, isopropanol), or others may be used. Formalin-fixed cells do not adhere to the slide and the staining quality is severely compromised for both Papanicolaou (PAP) and Diff-Quik (DQ) stains. Similarly, alcohol denatures protein, which prevents adherence of cells to the slide.
None of these fixatives are usually required, and simple refrigeration of the specimen, even for several days, preserves the specimen for cytologic evaluation.[1] However, if the specimen is expected to be transported with longer travel time, especially at an unexpectedly high ambient temperature, it may be collected in dilute solutions of alcohol. Depending on the individual laboratory protocol, a specimen may be mixed in 1:1 proportion with various fixatives such as preservatives for liquid-based cytology (LBC) (CytoLyt for ThinPrep and CytoRich Red, Yellow, or Blue for SurePath) or 50% ethanol [see Table 1]. Such specimens are not suitable for DQ staining. Because of initial interaction of the specimen with these fixatives, the results of immunophenotyping performed on the cell-block sections of these specimens may not be reliable when compared with published results.
PROCESSING OF EFFUSION FLUIDS
Gross examination
Physical features such as volume, color, clarity, opalescence, unusual odor, and high viscosity are noted. Although most of the malignant effusions are grossly blood-tinged, ranging from orange to deep red in color, only a proportion (46%) of bloodstained effusions may be positive for malignant cells.[1,23] The color of the effusion may suggest an underlying cause:
Chocolate brown: effusions with numerous melanin containing melanoma cells
Light brown: effusions associated with chronic hemorrhage due to the presence of many hemosiderophages
Brown-orange or even greenish (this color remains in the supernatant after centrifugation): effusions associated with jaundice or leakage of bile into the peritoneal cavity.
Hypercellular fluids, if allowed to stand, will show spontaneous, thick, grayish-white to yellow sediments at the bottom of the container. The cellularity may be due to numerous neutrophils in purulent effusions, which are usually malodorous due to high bacterial content. Effusions associated with rheumatoid pleuritis and pericarditis may also show a heavy whitish and flocculent sediment.
Individual groups of cancer cells (proliferation spheres) may be large enough (up to 2 mm in size) to be visible to the naked eye in effusion fluids as spheroids, ellipsoids, or similar shapes. Specimens with visible aggregates of cancer cells yield excellent diagnostic material in cell-block sections.
Cholesterol crystals make effusion fluid a turbid yellow, which shimmers when agitated. Cholesterol crystals can be seen in stained wet films and in DQ-stained preparations. But they are dissolved and may not be seen in PAP-stained preparations. Chylous effusions appear milky white with a creamy top layer of emulsified lipid.
Diffuse malignant mesothelioma of epithelial type is typically associated with a high concentration of hyaluronic acid (HA), which imparts high viscosity to the effusion and may be discerned with the naked eye. A high concentration of HA was reported in a pleural fluid from a child with metastatic Wilms’ tumor.[34-36] Peritoneal fluid from a patient with pseudomyxoma peritonei is markedly viscous because of the heavy mucoid content and is extremely difficult to aspirate. Processing this specimen may be difficult because the cells in it do not sediment during centrifugation. Such a specimen may have to be thinned with a suitable mucolytic agent such as dithiothreitol (in 50 μg/ml final concentration).
Cytopreparation
The specimen may be processed in accordance with the individual laboratory’s protocol [Tables 3-7,10]. The suggested protocol is summarized in Table 2, generating a set of slides as shown in Figure 1 for microscopic examination.
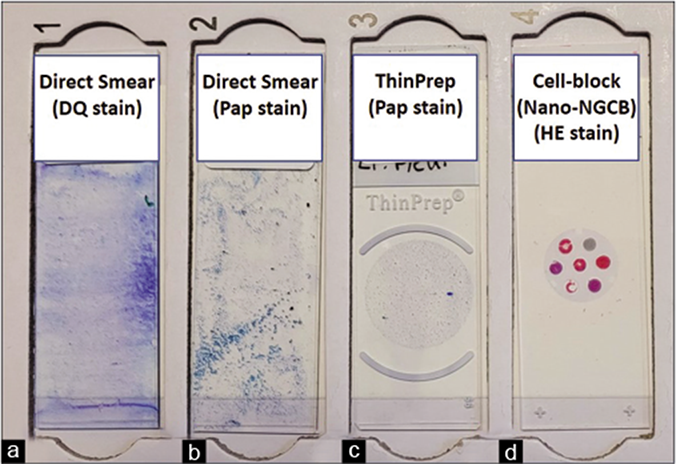
- Effusion cytology slide set generated by the recommended protocol (see Table 2). (a) DQ-stained direct smear. (b) PAP-stained direct smear. (c) PAP-stained ThinPrepTM smear. (d) HE-stained cell-block section (Nano-NGCB: Nano-NextGen CelBlokingTM). DQ, Diff-Quik; PAP, Papanicolaou; HE, hematoxylin and eosin.
All effusions may be routinely processed for preparation of DQ-stained smears after preparing a direct smear of the unconcentrated specimen for semiquantitative evaluation of cellularity [Table 2A]. The concentrated cellular sediment is processed for DQ-stained smears (air-dried direct smear or Cytospin), PAP-stained smears (air-dried rehydrated postfixed direct smear or wet-fixed or Liquid based cytology preparation: ThinPrep or SurePath), and hematoxylin and eosin (HE)-stained cell-block sections [Figures 1–7]. Immunocytochemistry may be performed on cell-block sections when indicated.
-
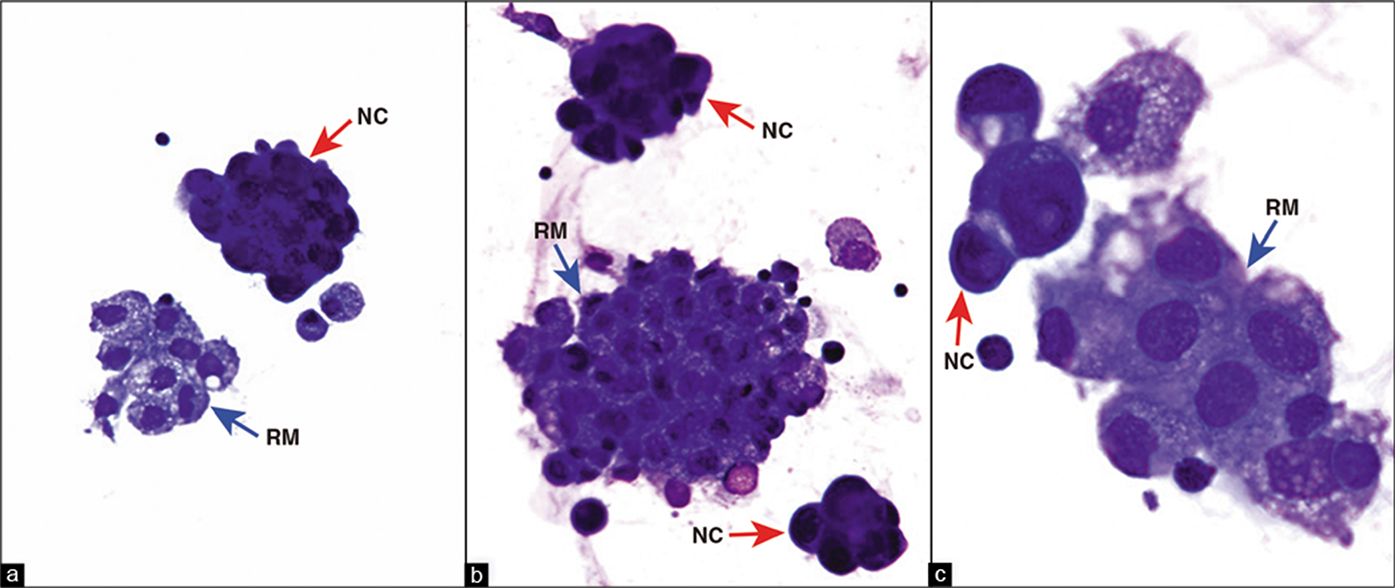
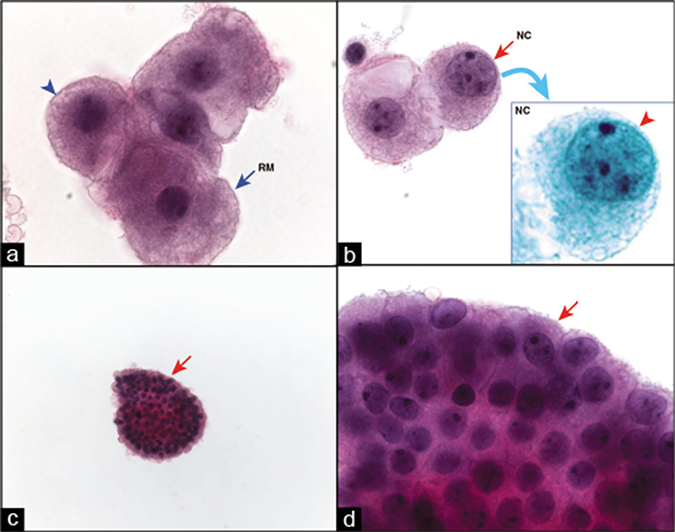
DQ-stained Cytospin smear. Metastatic pulmonary adenocarcinoma, pleural fluid. The reactive mesothelial cells (blue arrows RM) stand out from the ‘second’ population of metastatic carcinoma cells (red arrows NC). NC, neoplastic cells; RM, reactive mesothelial cells. (a,b, 40X; c, 100X.)
-
Papanicolaou (PAP)-stained SurePath smear. Metastatic adenocarcinoma, peritoneal fluid. The reactive mesothelial cells and the neoplastic cells are more difficult to distinguish from each other compared to those in DQ-stained smears [compare with Figure 2]. A few reactive mesothelial cells (RM in b) show eccentric nuclei. They usually have a thin rim of cytoplasm (blue arrow inset of b) between the cell periphery and the nucleus. The adenocarcinoma cells may not show such a rim of cytoplasm (red arrow in c, d, and inset of b). The PAP stain, however, facilitates evaluation of nuclear details even in groups of cells, at least along the periphery (arrowhead in d). Compare with DQ stain in Figure 2a,b. As the cell groups in SurePath smear are thicker, focusing these cells in one plane and photographing them is difficult. However, during actual microscopic examination of the smear, it is possible to evaluate the nuclear details by adjusting the fine focus (d). NC, neoplastic cell; RM, reactive mesothelial cell. (a, 40X; b–d, 100X.)
-
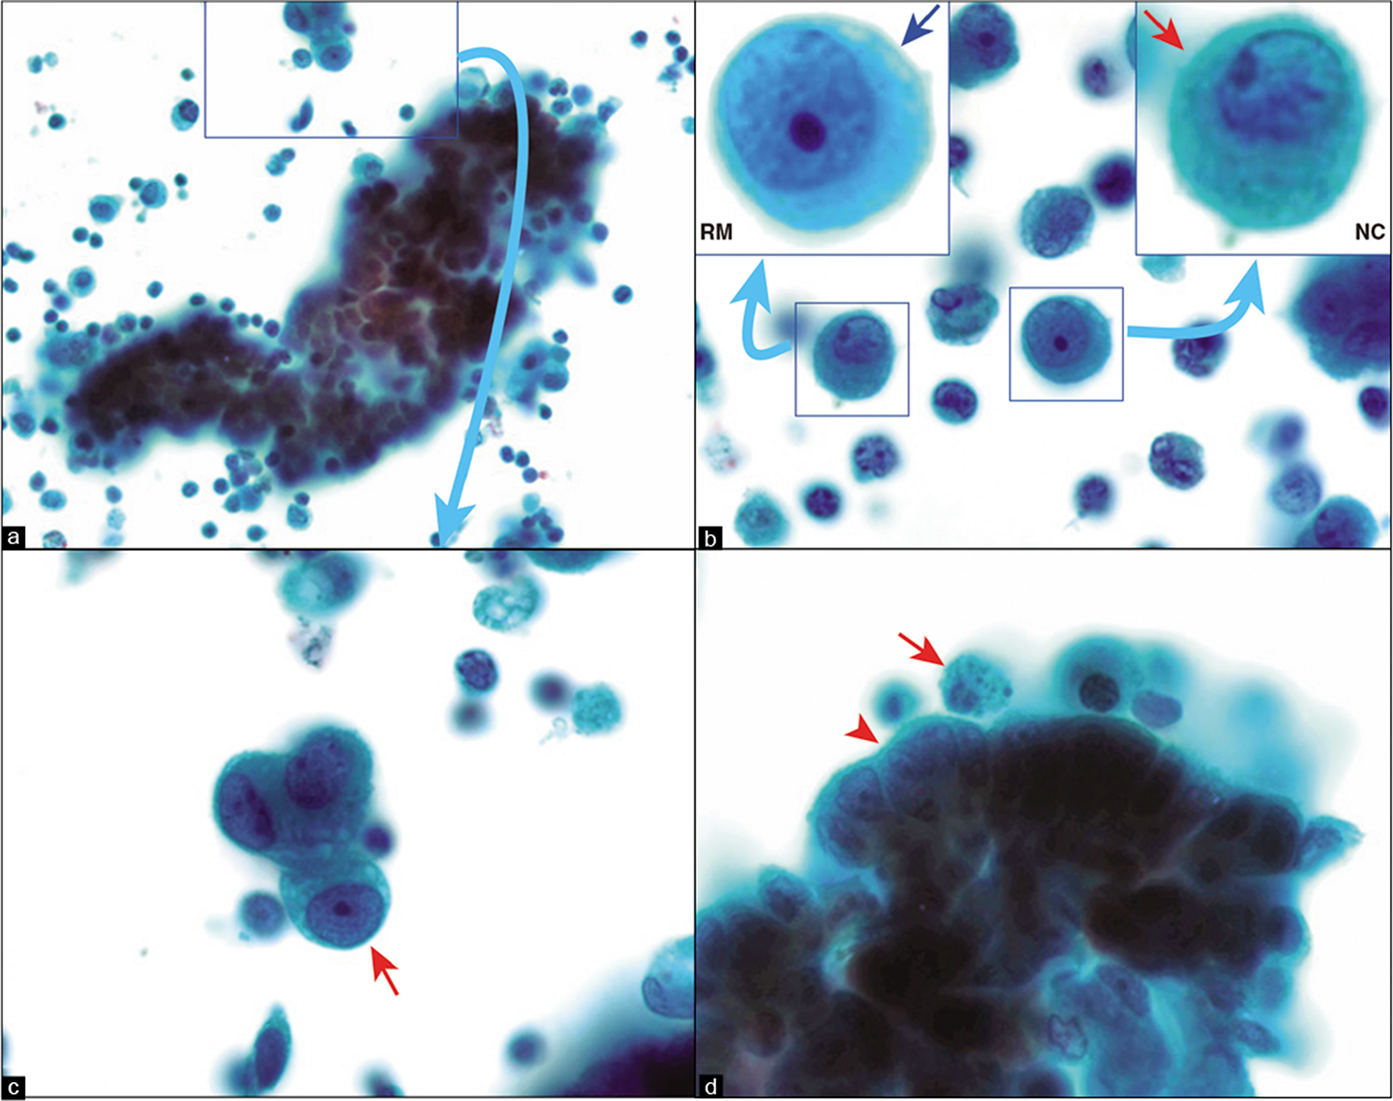
Papanicolaou-stained wet-fixed Cytospin smear. Metastatic mammary carcinoma, pleural fluid. Reactive mesothelial cells (black arrows RM in a–c) are mixed with carcinoma cells which have eccentric hyperchromatic nuclei with clumped chromatin (red arrow NC in d,e). Mitotic figures (arrowheads MF in d,e) and apoptotic cells (arrowheads AP in d,e) are also present. The cells appear slightly bigger and thinner than in SurePath smears [Figure 3] with excellent chromatin details, but cellularity of these preparations may not be reproducibly good. AP, apoptotic cancer cells, MF, mitotic figures; NC, neoplastic cells; RM, reactive mesothelial cells. (a, 10X; b, 40X; c–e, 100X).
-
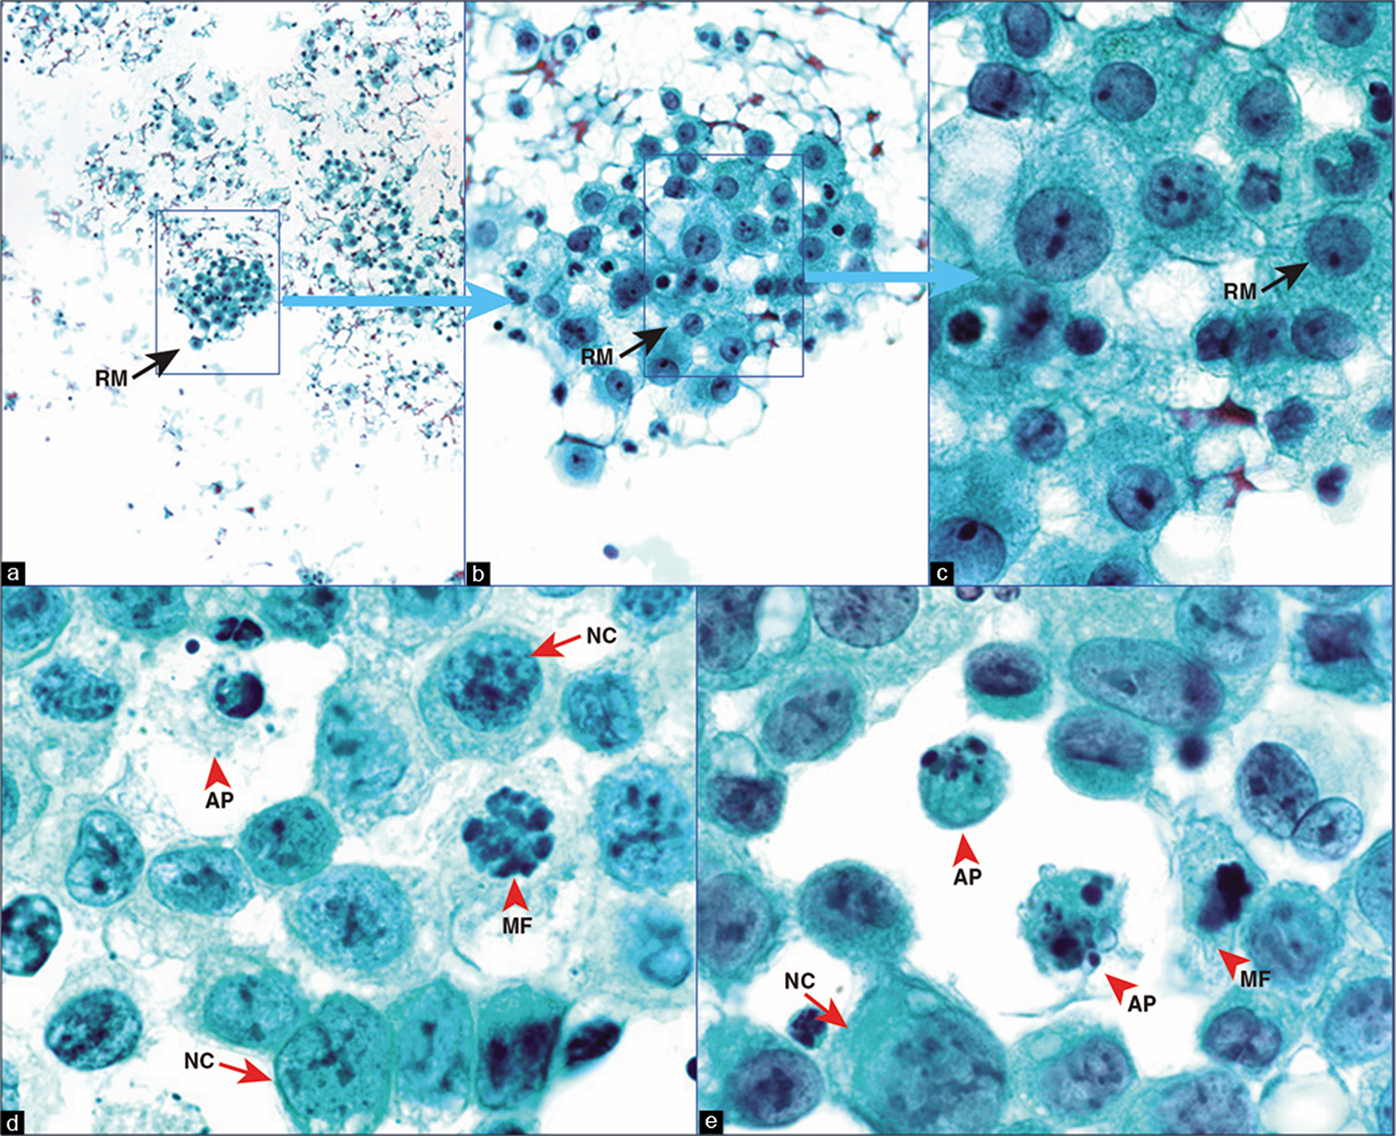
Papanicolaou (PAP)-stained ThinPrep smear. Metastatic mammary adenocarcinoma, pleural fluid. The reactive mesothelial cells (blue arrow RM in a) with peripheral vacuolization (blue arrowhead in a) and central nuclei are mixed with a few isolated neoplastic cells (red arrow NC in b) with eccentric nuclei touching the periphery without adjacent rim of cytoplasm (red arrowhead inset NC of b). Note that the morphologic details of cell groups such as proliferation spheres can also be evaluated with PAP stain (arrows in c,d) [compare with DQ stain in Figure 2a]. NC, neoplastic cells; RM, reactive mesothelial cells. (a, b, 100X; c, 20X; d, 100X.)

-
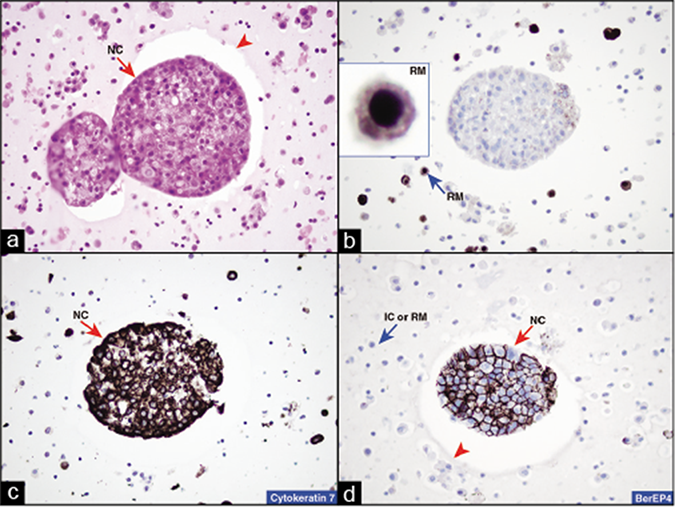
Hematoxylin and eosin (HE)-stained sections of cell block prepared by HistoGel. Metastatic mammary adenocarcinoma, peritoneal fluid. Cellular component of effusion along with proliferation spheres, smaller groups of cancer cells, and isolated cancer cells are scattered randomly in the section (a,b). The cell block sections allow evaluation of the architectural features, such as those of proliferation spheres of adenocarcinoma cells, which are either hollow (arrows in a–c) or solid without a central stromal core (arrowhead in d). (a, 10X; b, 20X; c, 40X; d, 100X.)
-
Immunoperoxidase staining of sections of a cell block prepared with HistoGel. Metastatic mammary adenocarcinoma, pleural fluid. There is lack of any non-specific background staining. Note a clean edge of the gel (arrowheads in a,d) around the proliferation sphere of neoplastic cells (NC). Edge artifact of immunostaining is also absent (arrowhead in d). The neoplastic cells in the proliferation spheres are non-immunoreactive for calretinin (b) with strong immunoreactivity for cytokeratin 7 (c) and BerEP4 (d) consistent with metastatic breast carcinoma. IC, inflammatory cells; NC, neoplastic cells; RM, reactive mesothelial cells. [a, HE-stained cell block section; b–d, immunostained cell block sections. (a–d, 40X).]
Cell-blocks are routinely prepared or at least when there is clinical history of cancer or when initial examination of the smears suggests malignancy. Cell-blocks are recommended for all serous cavity washings. In addition to immunocytochemistry, cell-block sections may be used for histochemistry studies such as mucicarmine stain, PAS, Periodic Acid -Schiff stain, and various other stains including stains for microorganisms such as fungi, mycobacteria, etc.
Rarely, depending on the clinical situation and available resources at an individual laboratory, immunocytochemistry may be performed directly on cytology smears.[39] PAP-stained smears without de-staining or after de-staining may be used. However, because of numerous technical and quality control issues, cell-blocks should be preferred for immunocytochemical evaluation.
In the past, electron microscopy had a major application in distinguishing mesotheliomas from adenocarcinomas. However, advances and refinements in immunocytochemistry have eclipsed the traditional role of electron microscopy in cytopathology of effusions. At present, electron microscopy is rarely applied to the effusions.
If, for any reason, the specimen is indicated to be processed for electron microscopy, it is first centrifuged at a slow speed of 1500 rpm for 8 minutes. The pellet of sediment is fixed in glutaraldehyde and transferred to the electron microscopy laboratory.[16,41-43]
Mesothelial cells have slender, bushy microvilli compared to the lack of microvilli or the short, stubby microvilli of adenocarcinoma cells. Reactive mesothelial cells also demonstrate microvilli and show wide variation in their morphology, overlapping with mesothelioma. The main challenge to ultrastructural analysis of effusion fluids is selection of unequivocal cancer cells from many reactive mesothelial cells in the background. In contrast, usually the malignant cells can be identified easily in immunostained sections, especially by the SCIP approach.
Stained wet films have been advocated by Bernard Naylor [Table 7].[1,16] This initial evaluation assists in proper triage of the effusion fluid specimen for microbiology, immunocytochemistry, cell biology, flow cytometry, cytogenetics, etc. As reported by Filie et al,[44] individual specimen triage, however, does not offer any practical advantage over the non-triaged, regularly processed effusion specimens. The use of stained wet films thus may not have any benefit if processing of effusions routinely includes DQ-stained air-dried Cytospin smears (along with PAP-stained smears and preparation of a cell-block).
Depending on laboratory preferences, various types of smears may be prepared.[45] If the smear is immersed quickly in the jar of fixative prior to any drying of the smeared material, it is a wet-fixed smear. The fixative is usually 95% ethanol, but other alcohols such as 95% methanol, 95% isopropanol, or a commercially available spray fixative with Carbowax (polyethylene glycol) may be used. If a spray fixative is used, the Carbowax must be removed by passing the slides through absolute alcohol prior to staining. For the PAP stain, usually wet-fixed smears are preferred. But, wet-fixed smears cannot be used for Romanowsky stains.
Multiple smears may be accommodated in a fixative jar with a paper clip on one end to avoid the slide touching another slide. Alternatively, coplin jars with grooves for the slides prevent slides from touching each other. Spray fixatives may create a ‘pooling’ artifact, especially in bloody specimens, manifested by the smeared material forming small round ‘pools’ throughout the slide. This is visually annoying, but it may not interfere with interpretation.
If a smear is allowed to dry completely by gently moving in the air or with a hair-dryer or with a small handheld battery operated fan,[48] it is an air-dried smear, which is required for Romanowsky stains. However, air-dried smears may also be used for PAP staining after saline-rehydration followed by fixation in fixatives such as 95% ethanol or 95% ethanol with 5% acetic acid.[37]
Preparation of other smears
Depending on an individual laboratory’s protocols, other smears such as Cytospin smears [Table 4, Figure 12] and proprietary LBC smears (SurePath or ThinPrep) [see Table 5, Figures 13,14] may be prepared. Non-proprietary methods for LBC preparations have been reported;[24,25] these may be applied to effusions. Cytospin smears may be air-dried or wet-fixed and may be stained with a Romanowsky or PAP stain. Smears prepared by LBC methods cannot be used for staining with a Romanowsky stain.
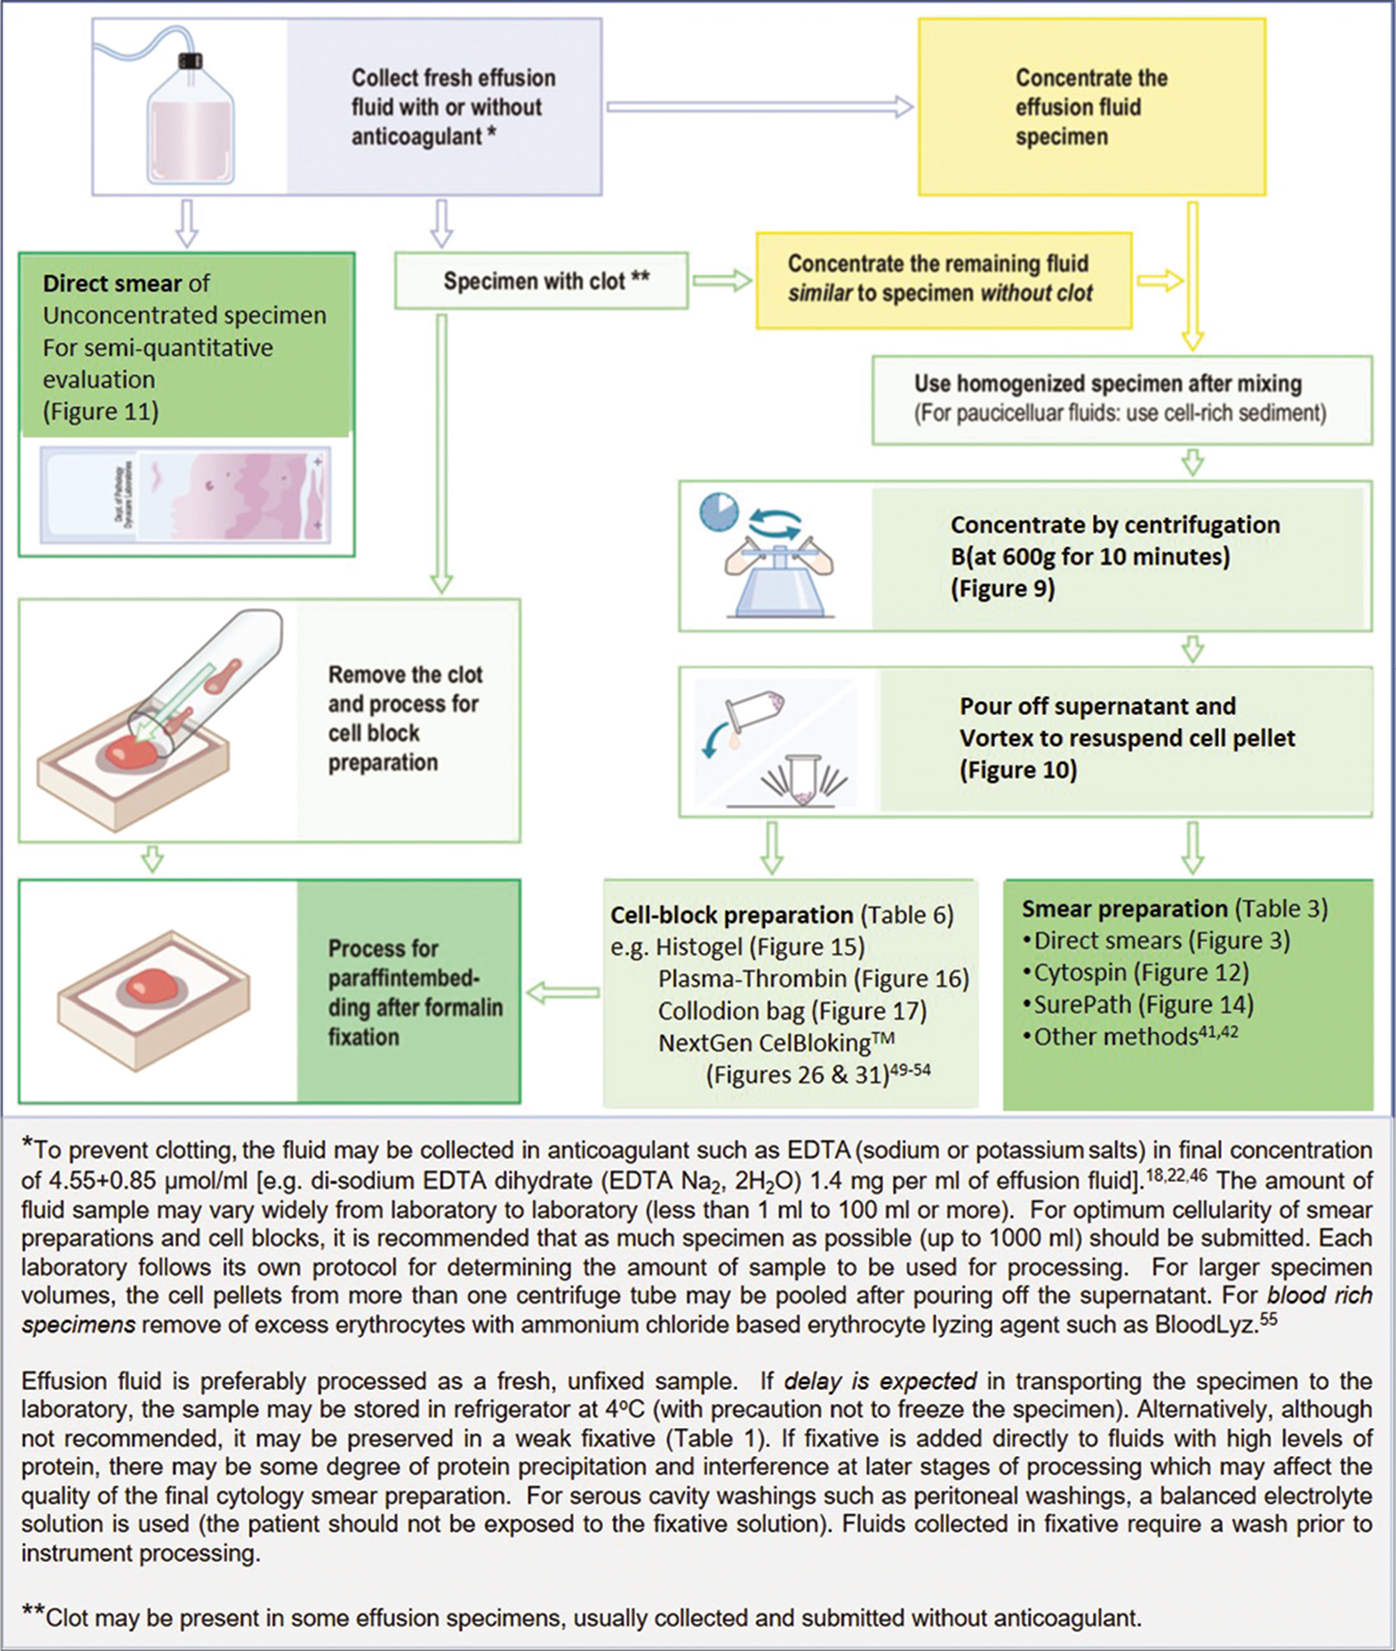
- Processing effusion fluid for cytopathologic evaluation.
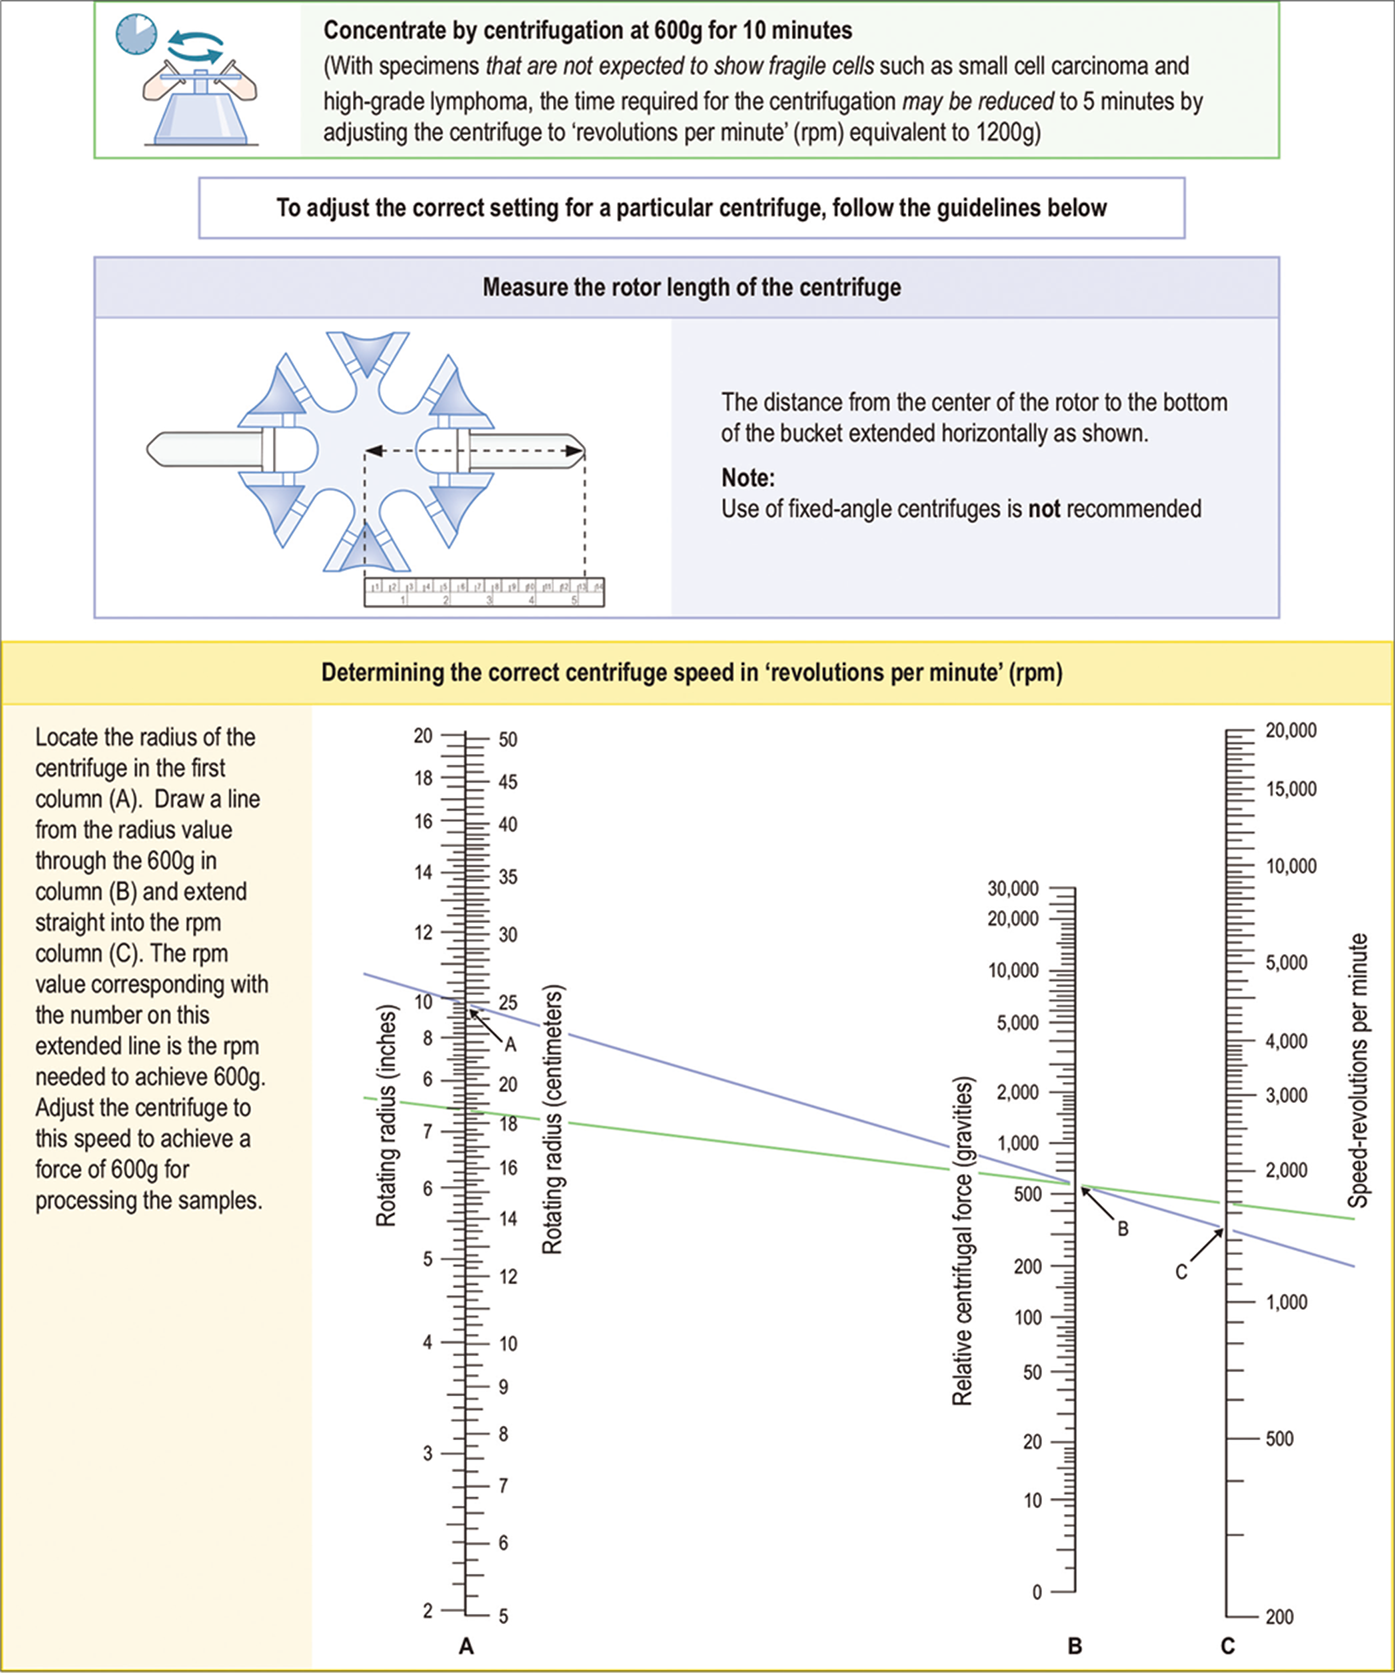
- Concentration of effusion fluid by centrifugation.
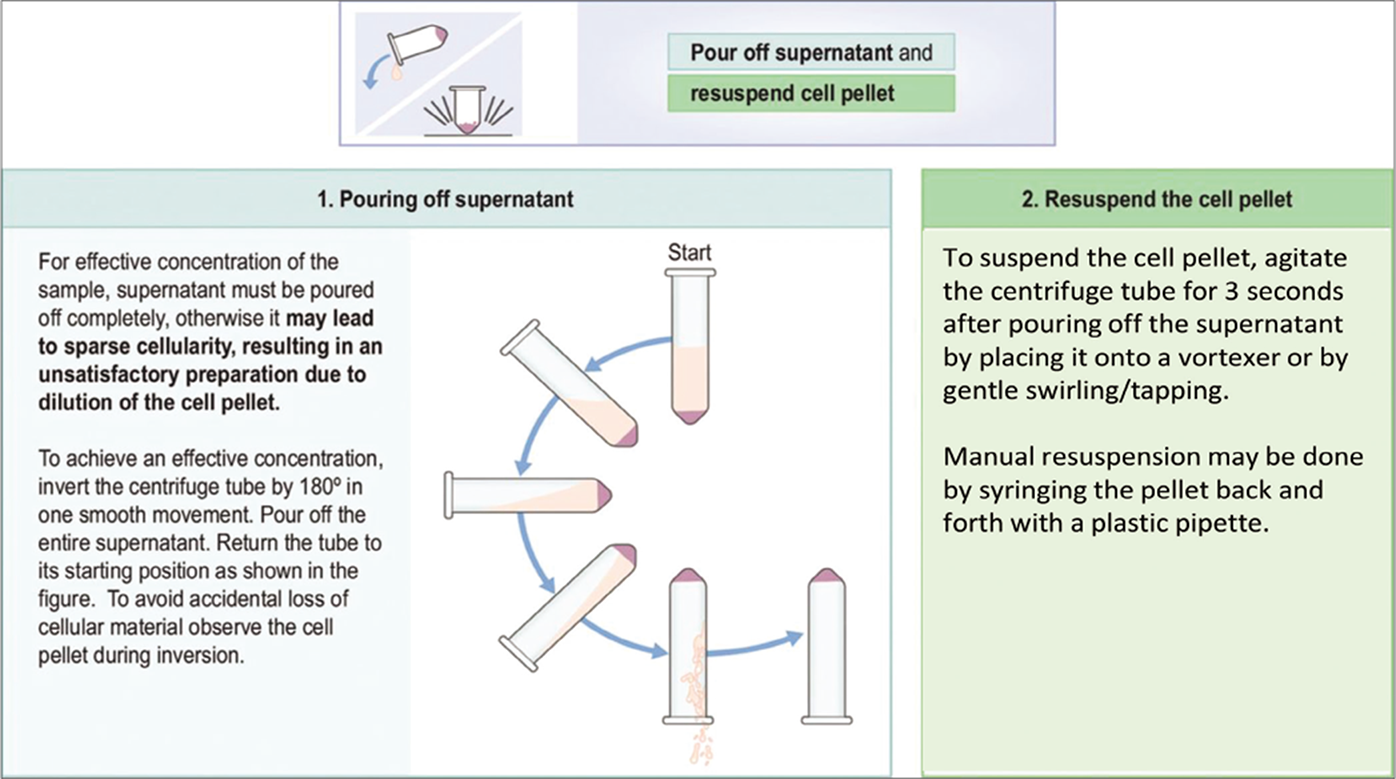
- Pouring off supernatant and resuspending the cell pellet.

- Preparation of direct smears.
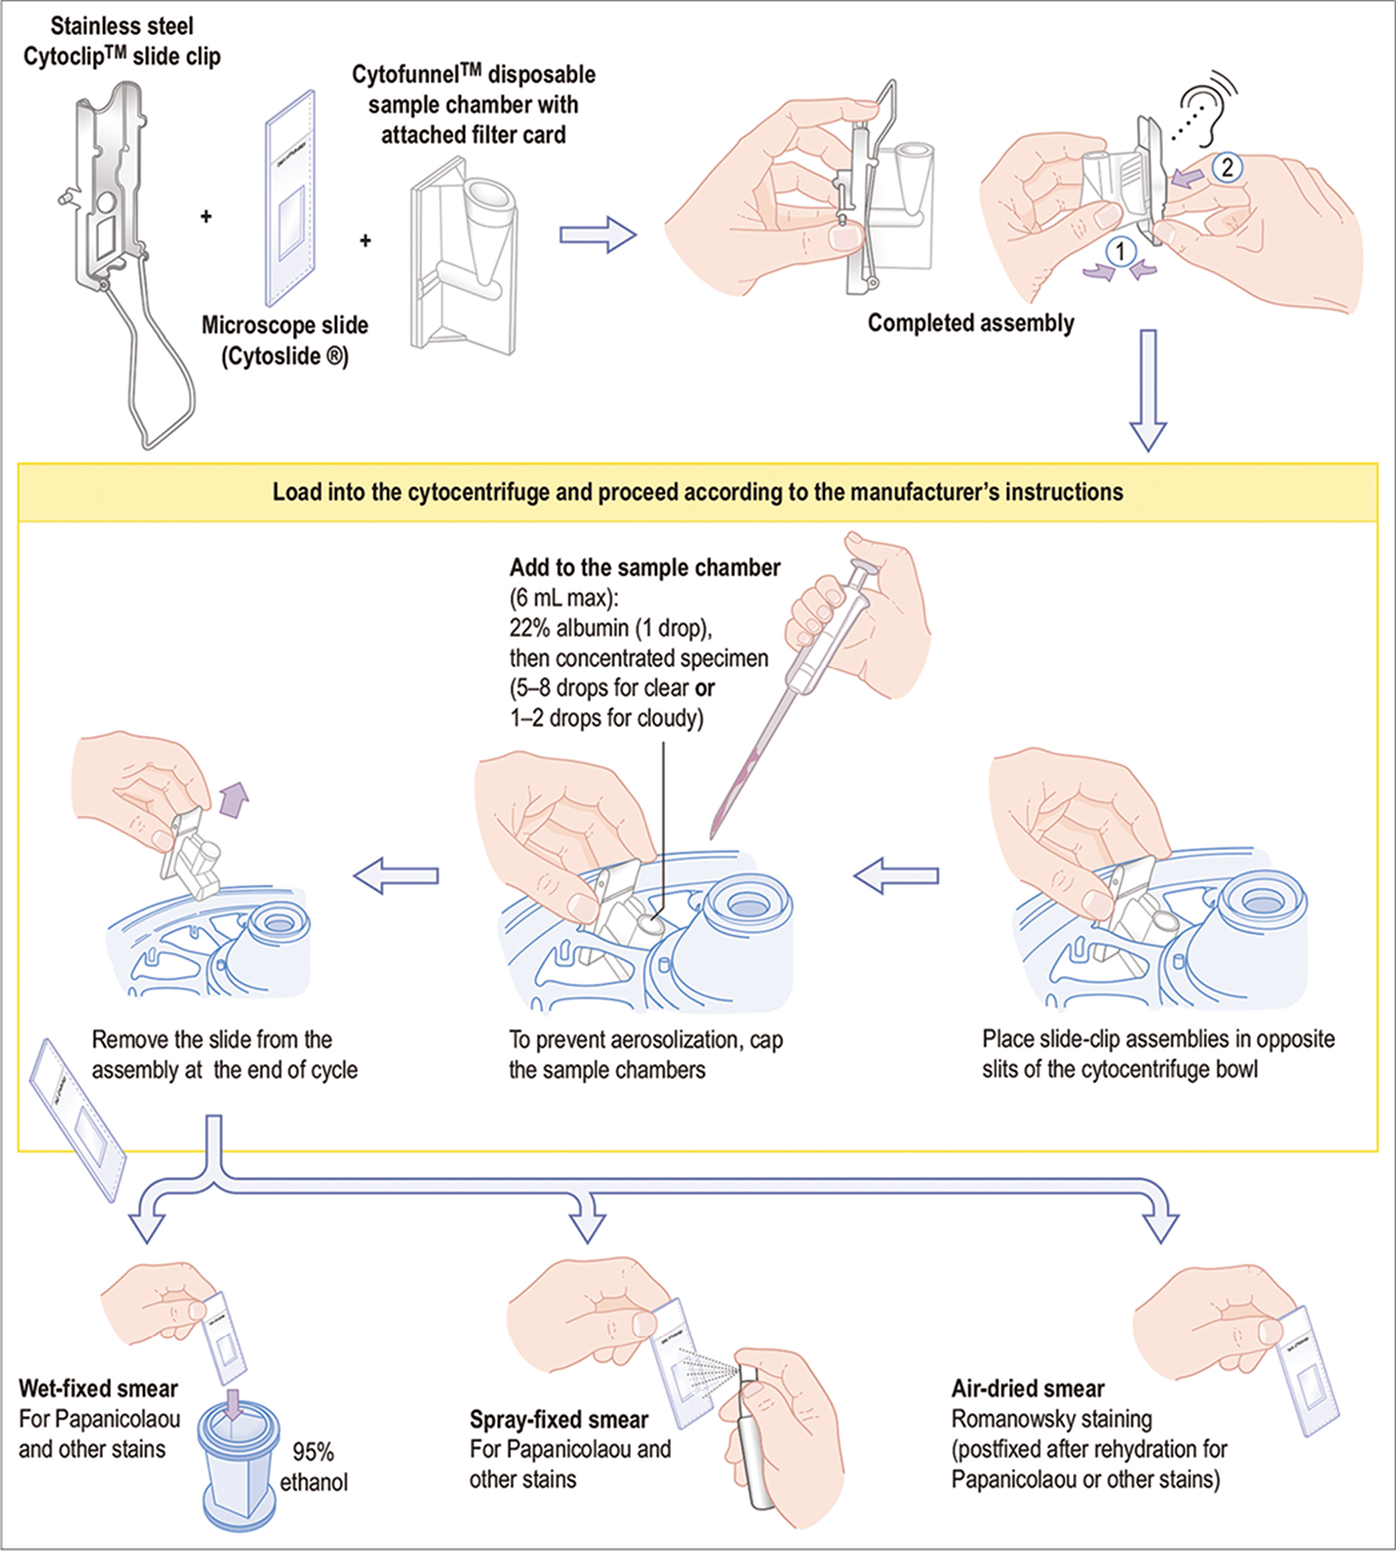
- Protocol for Cytospin preparation by cytocentrifugation as MEGA funnel [for Romanowsky stain (such as Diff-Quik), PAS stain, and other special stains]. (For exact details see manufacturer’s procedure manual.)
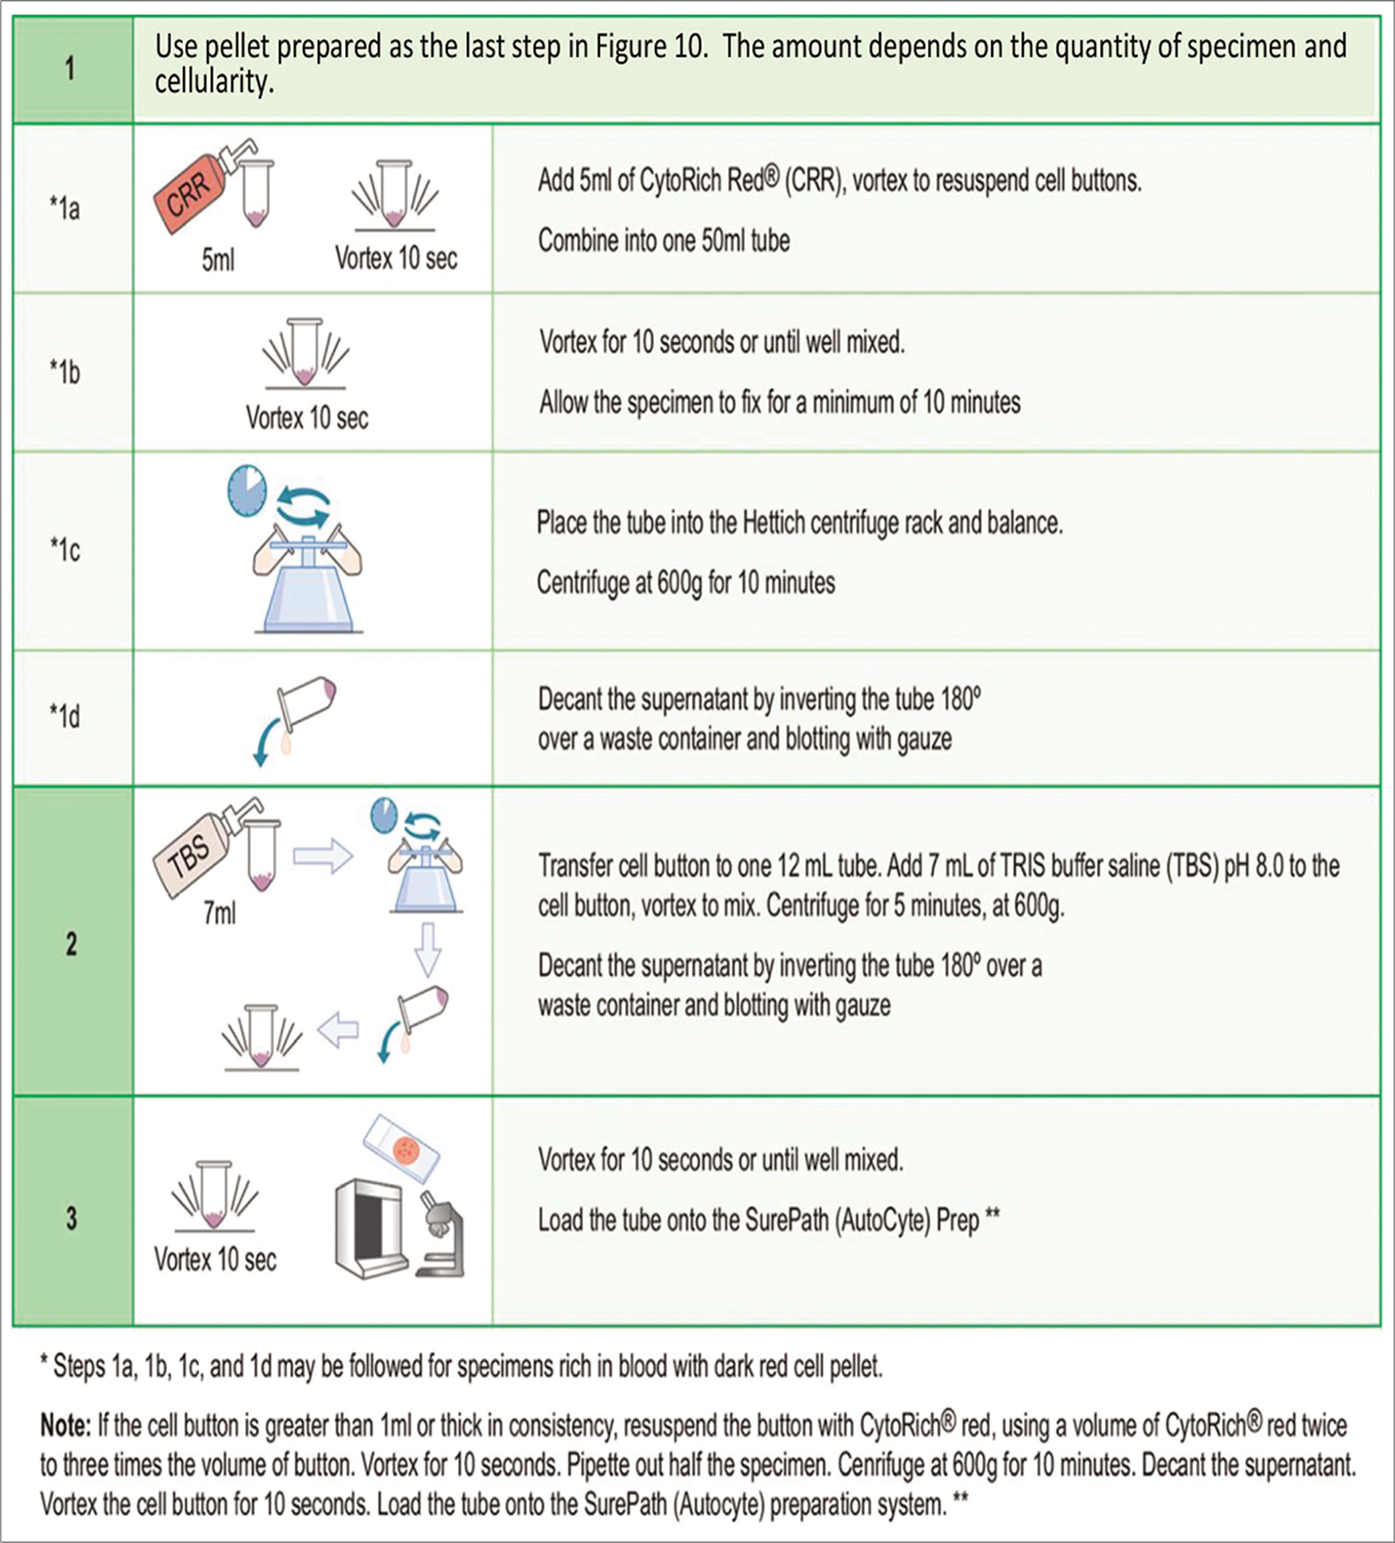
- Protocol for SurePath preparation. **For exact details, see manufacturer’s procedure manual.
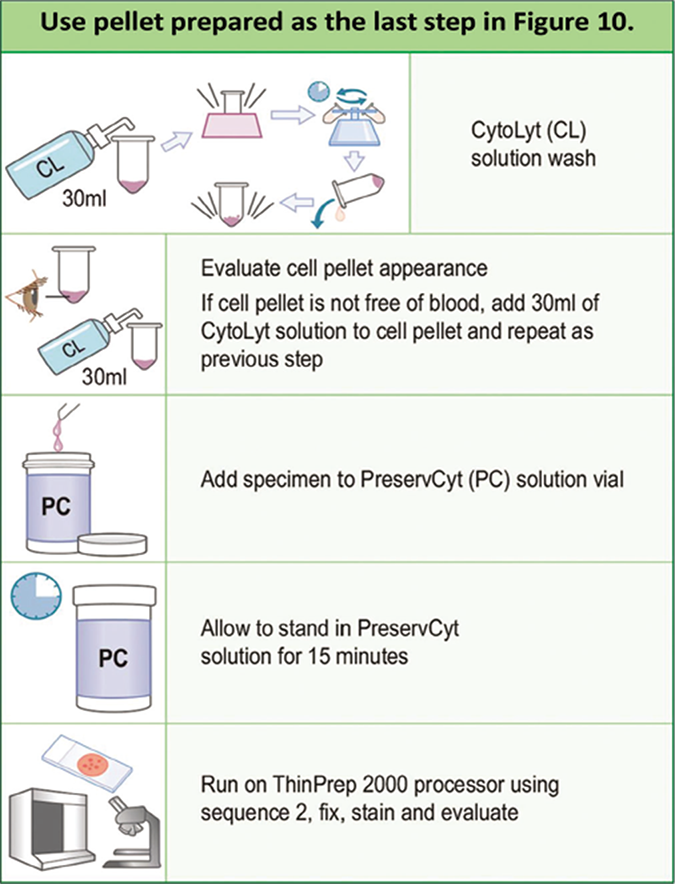
- Protocol for ThinPrep preparation. (For exact details see manufacturer’s procedure manual.)
In general, the direct smears prepared from concentrated fresh unfixed effusion specimens show flat cells with better cytomorphology. However, proper spreading and homogeneous distribution of the cells without introduction of artifacts may be difficult in specimens with fragile cells present in small cell carcinoma and high-grade lymphoma. In contrast, Cytospin smears[38] of concentrated fresh unfixed effusion specimens also show a thin layer of cells with better morphology and good distribution, but the cellularity of the smears may not be reproducible. Filters used in the past allowed good concentration and retrieval of cells from effusions, but the cellular details may not be as clear because of optical interference by the filter.
Smears prepared by LBC offer better concentration and distribution of cells, with their benefits and limitations depending on the method chosen. Their main limitation for some laboratories may be their cost and availability. Non-proprietary LBC methods[24,25] may require standardization by each laboratory, with variable results. LBC such as SurePath smears[19] are relatively cellular, with well-preserved cells, but the cellular details are less crisp. In general, the cells are shrunken with reduced transparency. Because all cells in a group cannot be focused in the same plane, these smears are also difficult to photograph [see Figure 5], especially the three-dimensional cell groups. ThinPrep smears[20] have relatively flat cells with better visibility of cellular details. The interpreting pathologist should be aware of associated morphologic variations responsible for limitations and benefits inherent with any selected method.
CELL-BLOCK PREPARATION
Although cell-blocks are not routinely prepared in all laboratories, most of the experts in this field strongly recommend cell-block preparation as a routine approach. [44,56] The residual sediment and/or any spontaneously formed clot may be processed for a cell-block after preparation of the smears. Various methods for cell-block preparation are shown in Table 10 and Figures 15-17,19, 34.
- Protocol for preparing cell-blocks with HistoGel (see also Table 10B).46 * HistoGel™ may also be melted in a microwave oven in a microwave-safe plastic tube or a glass tube.
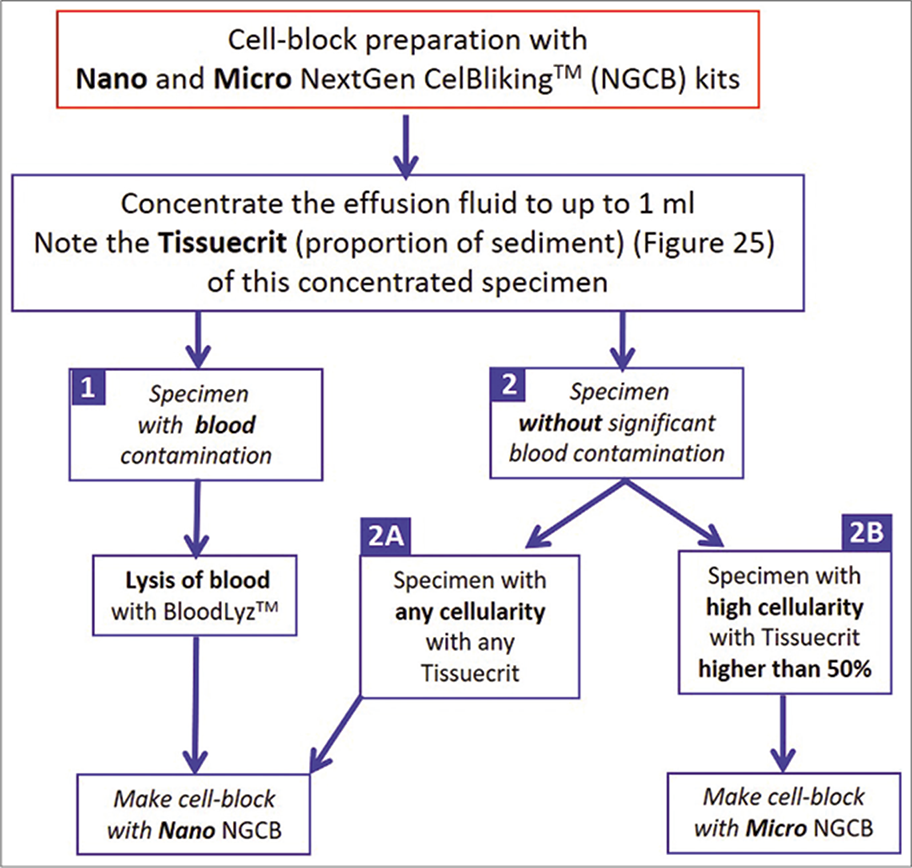
- Selection of NextGen CelBloking™ kits (Nano-NGCB kits) for cell-blocking based on the cellularity of effusion specimen
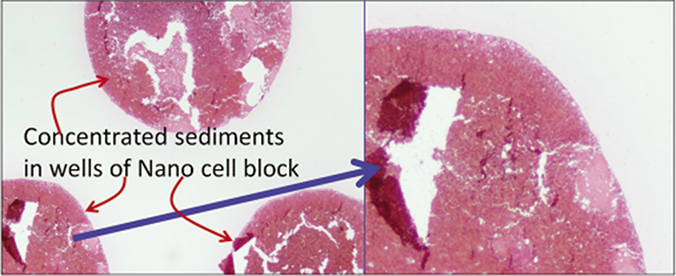
- Low magnification view of the sections of cell-block produced by Nano NextGen CelBloking™ kit of blood contaminated cytology specimens. Theses sections have tendency to float and fold especially during immunostaining and other procedures requiring handling and processing through multiple reagents with problems related to floater contamination.(Reproduced from open access publication: Shidham VB. CytoJournal 2019;16:12)
- Blood interference in cell-block produced by Nano NextGen CelBloking™ kit from blood contaminated cytology specimens (same is applicable to any other method for blood rich specimens): a & b. Section from the bottom of the wells with specimen sediments rich in red blood cells. The diagnostic tumor cell are missing in this zone, c. The deeper levels showed more tumor cells, but this level cannot be predicted and so a possibility of catching the diagnostic cells depend on chance factor with frequent sampling artifact. (Reproduced from open access publication: Shidham VB. CytoJournal 2019;16:12)
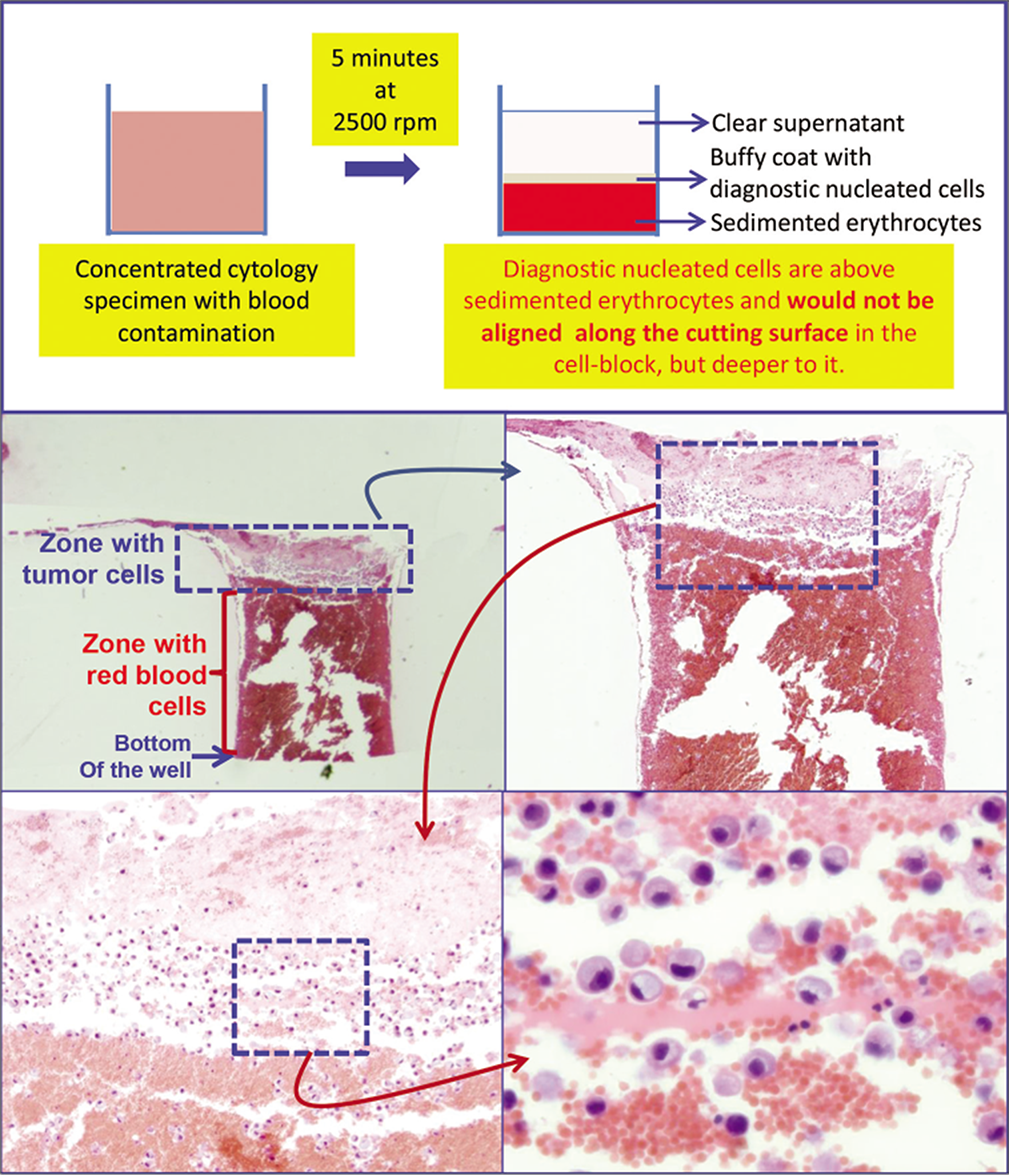
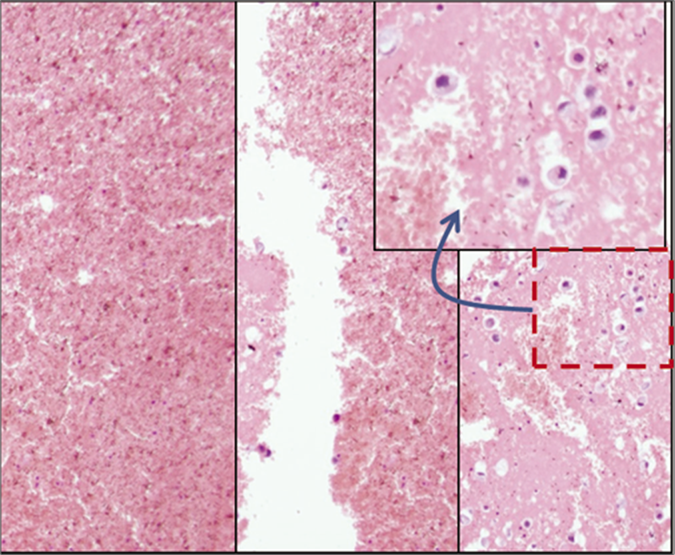
- Schematic showing result of centrifuging the blood rich concentrated specimen with diagnostic cells which group with nucleated cells in the buffy coat area above red blood cells. b. The longitudinal sections of one of the wells in the cell-block made with Nano NextGen CelBloking™ kit (Nano-NGCB kit). Blood contaminated cytology specimen (HE stain). c. The bottom of the wells is predominantly red blood cells with tumor cells on the top which will be way deep to the actual cutting surface of usual cell blocks (HE stain). d and e. Higher magnification showing the diagnostic tumor cells in the area corresponding with buffy coat (HE stain). (Reproduced from open access publication: Shidham VB. CytoJournal 2019;16:12)
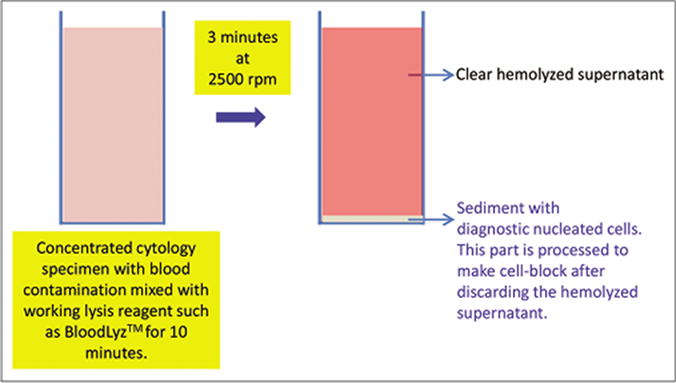
- Processing of blood contaminated cytology specimens with BloodLyz™ to nullify the problems related to red blood cell contamination. (Reproduced from open access publication: Shidham VB. CytoJournal 2019;16:12)
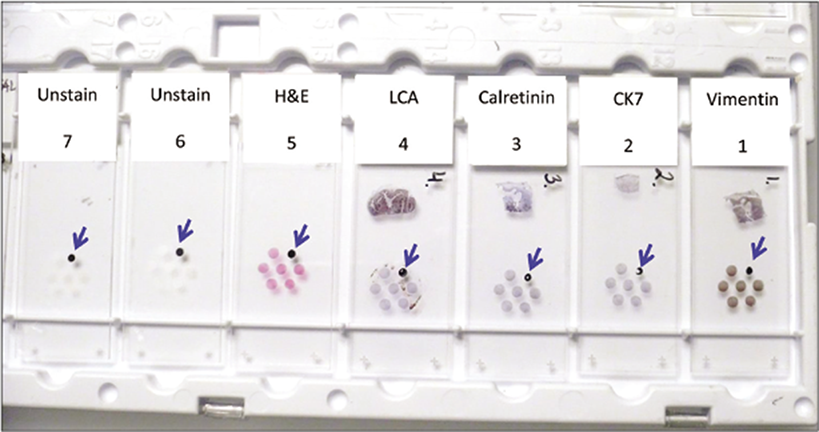
- Cell-blocking (with NGCB kit) and AV marker: subtractive coordinate immunoreactivity pattern (SCIP) approach. Identical orientation of all sections on glass slides with proper labeling of their exact sequence in relation to each other. From Open Access publication: CytoJournal 2021;18:2. https://dx.doi.org/10.25259/Cytojournal_83_2020
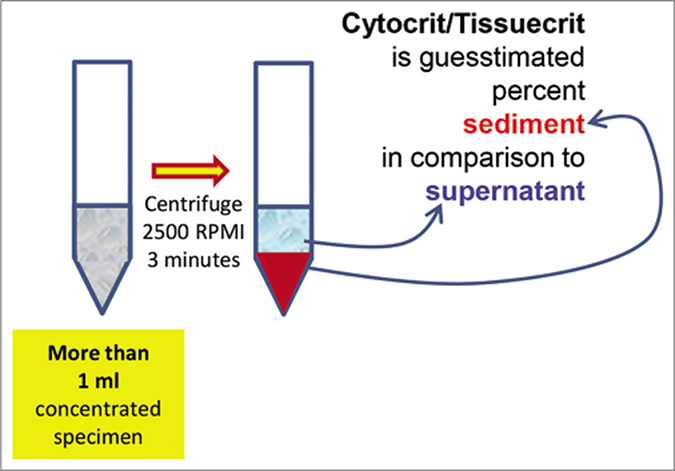
- Cytocrit/Tissuecrit defined (to categorize the cytology specimens for selection of Cellblocking protocols). For choosing Cellblocking protocols for optimum yield, the cytology specimens may be broadly divided into two categories: a. Hypocellular- Specimens generating less than 1 ml final concentrated sediment with less than 50% Tissuercrit. b. Cellular- Specimens generating more than 1 ml final concentrated sediment with more than 50% Tissuercrit. (Reproduced from open access publication: Shidham VB. CytoJournal 2019;16:12)
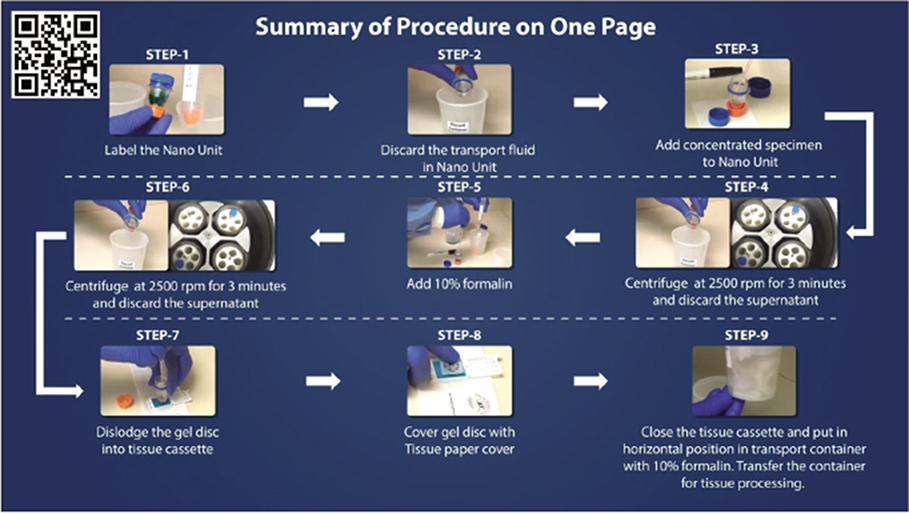
- Summary of cell-block preparation protocol for Nano NextGen CelBloking™ kit (Nano-NGCB kit).[50] Manufacturer web site has multiple videos including suggested approach for simultaneous processing multiple specimens[51] under ‘Resources’ tab (Courtesy: www.AVBioInnovation.com) at https://www.avbioinnovation.com/uploads/resources/pdf/Summary-%20Nano%20NGCB%20kits-%20Processing%20single%20specimen.pdf
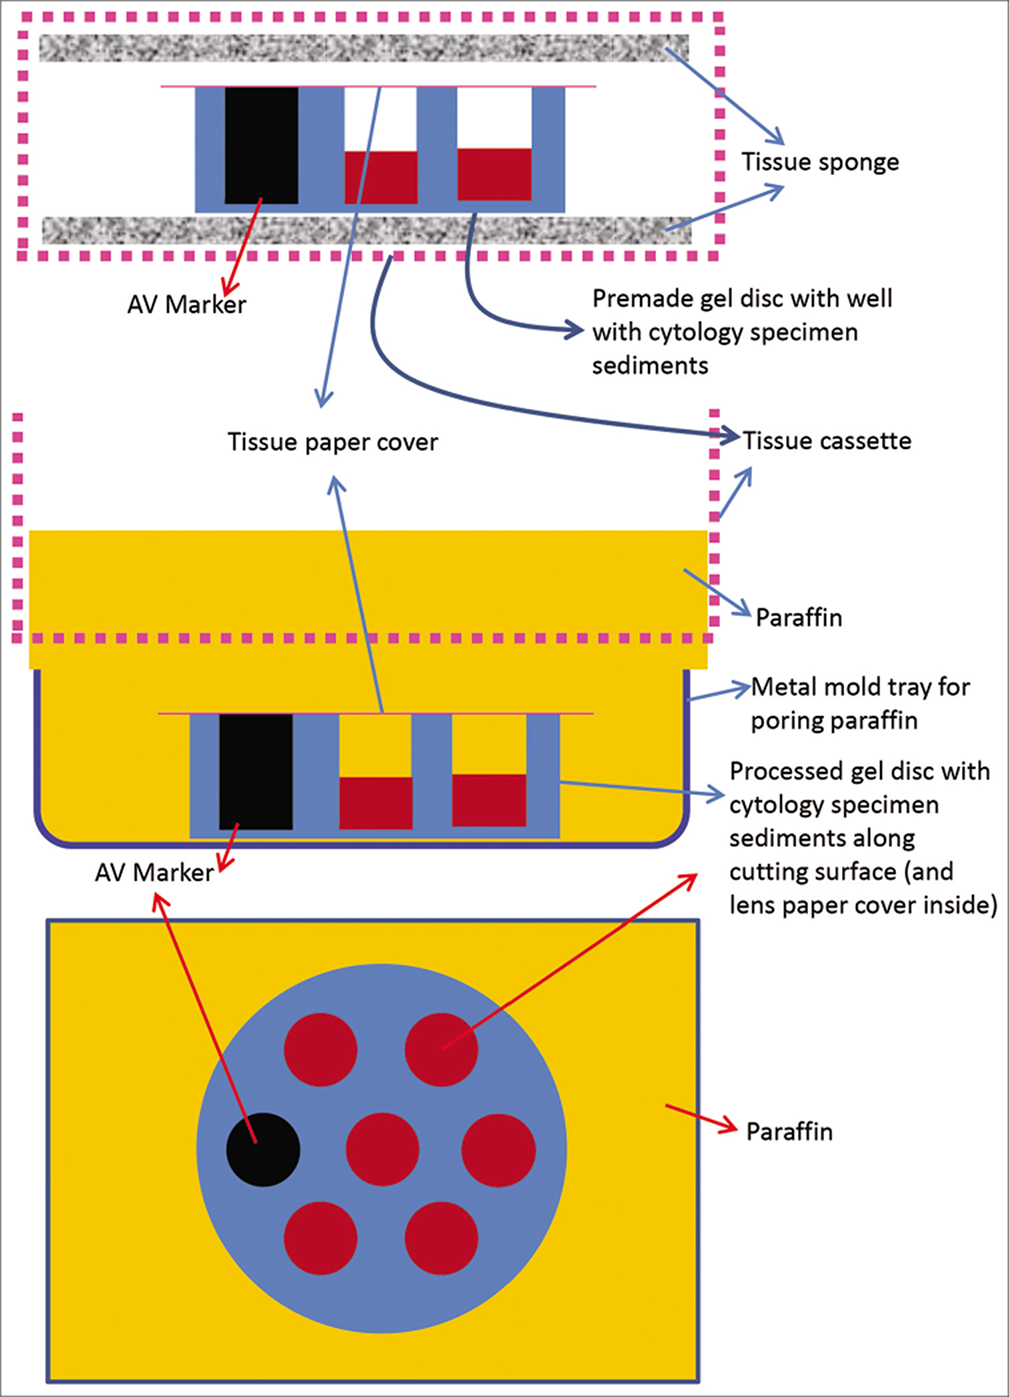
- Cell-block prepared with Nano NextGen CelBloking™ kit (Nano-NGCB kit). a. Gel disc with preformed wells loaded with diagnostic material transferred to the tissue cassette for tissue processing. b. Embedding of tissue processed gel disc of Nano NextGen CelBloking™ kit (Nano-NGCB kit) with diagnostic material. The tissue paper cover is opposite the cutting surface and the bottoms of the wells is the cutting surface. c. The cutting surface of the final cell block with gel disc of Nano-NGCB unit after rough cut removing the bottom layer of the disc exposing the precisely set dark colored AV marker corresponding with the bottoms of the wells with concentrated diagnostic material. (Reproduced from open access publication: Shidham VB. CytoJournal 2019;16:12)
- Cutting of paraffin block prepared with Nano NextGen CelBlokingTM kit (Nano-NGCB kit). (Reproduced from open access publication: Shidham VB. CytoJournal 2019;16:12)
- a. Final paraffin block; b. Scanning power view of HE stained section of cell-block prepared with Nano NextGen CelBlokingTM kit (Nano-NGCB kit). The preformed Nano gel disc is made of proprietary medium which allows the processing reagents to be exchanged freely but the diagnostic cells are retained and concentrated in the wells. The gel medium has clean transparent property as a clean background (pleural fluid) (Reproduced from open access publication: Shidham VB. CytoJournal 2019;16:12)
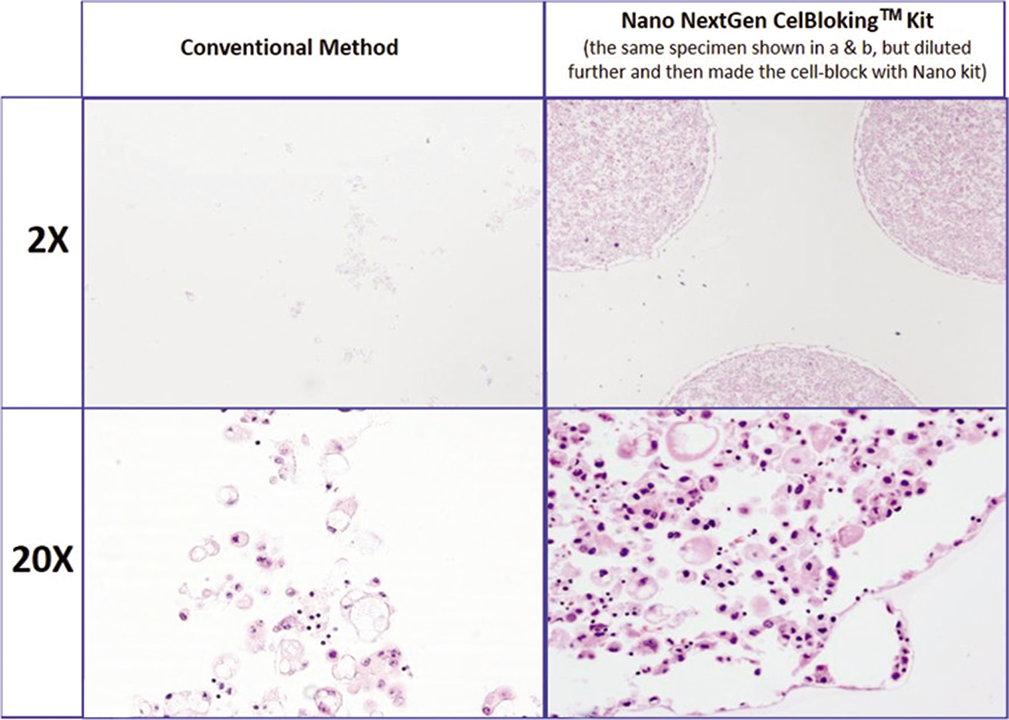
- Comparison of the morphological details and quantitative enhancement by Nano NextGen CelBlokingTM kit (Nano-NGCB kit). (Metastatic adenocarcinoma, pleural fluid). a & b. Cell-block section with very scant cellularity (conventional random, indiscriminatory, plasma-thrombin method); c & d. very cellular cell-block section with many diagnostic cells in the wells (cell-block prepared with enhancement method- Nano-NGCB kit (AV BioInnovation, based on Shidham method http://www.jove.com/index/Details.stp?ID=1316) (Reproduced from open access publication: Shidham VB. CytoJournal 2019;16:12)
- Summary of cell-block preparation protocol for Micro NextGen CelBlokingTM kit (Micro -NGCB kit).[52] Manufacturer web site has multiple videos including suggested approach for simultaneous processing multiple specimens[53] under ‘Resources’ tab (Courtesy: www.AVBioInnovation.com) at https://www.avbioinnovation.com/uploads/resources/pdf/Summary-%20Micro%20NGCB%20kits-%20Processing%20single%20cellular%20specimen.pdf
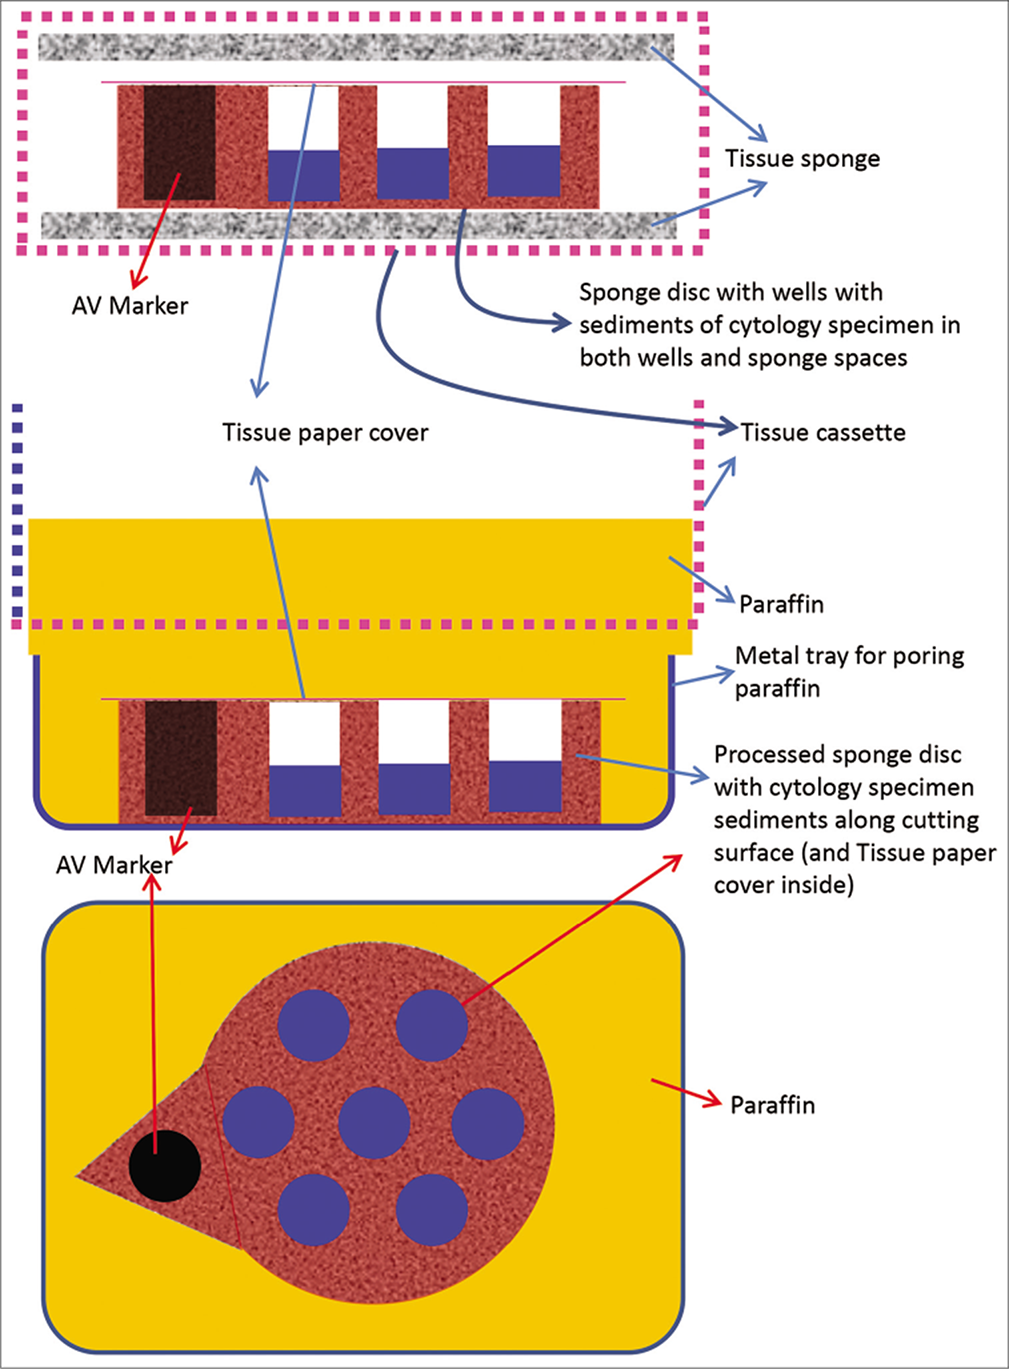
- Cell-block prepared with Micro NextGen CelBlokingTM kit (Micro -NGCB kit) unit. a. Sponge disc with preformed wells loaded with diagnostic material transferred to the tissue cassette for tissue processing. b. Embedding of tissue processed sponge disc of Micro-NGCB kit unit with diagnostic material. The tissue paper cover is opposite the cutting surface and the bottoms of the wells is the cutting surface. c. The cutting surface of the final cell block with sponge disc of Micro-NGCB kit unit after rough cut removing the bottom layer of the disc exposing the precisely set dark colored AV marker corresponding with the bottoms of the wells with concentrated diagnostic material. (Reproduced from open access publication: Shidham VB. CytoJournal 2019;16:12)
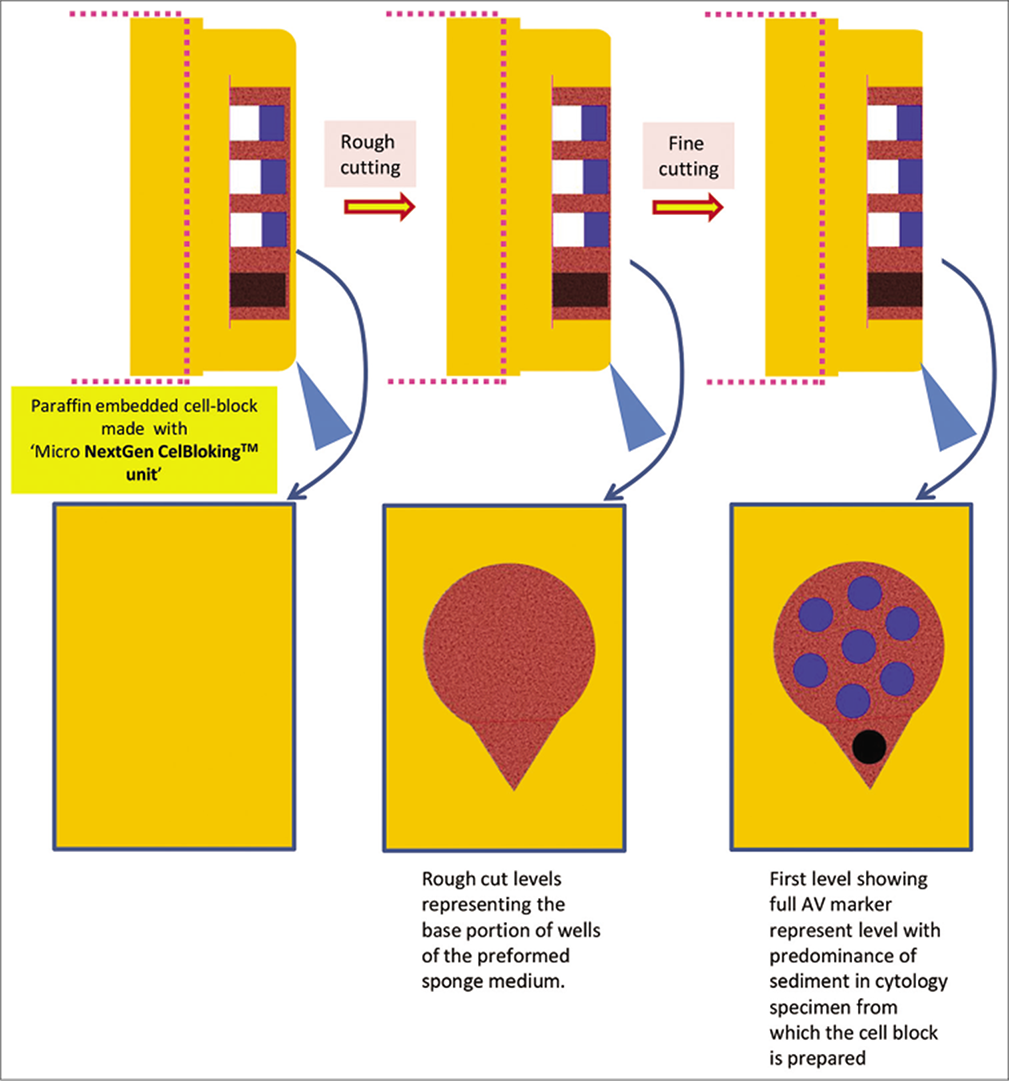
- Cutting of paraffin block prepared with Micro NextGen CelBlokingTM kit (Micro-NGCB kit) unit. (Reproduced from open access publication: Shidham VB. CytoJournal 2019;16:12)

- a. Final paraffin block; b. Scanning power view of HE stained section of cell-block prepared with Micro NextGen CelBlokingTM kit (Micro-NGCB kit). The preformed Micro sponge disc is made of proprietary porous medium which concentrates the diagnostic cells predominantly in the wells but the small groups of cells and singly scattered cells wandered around during concentration process may also be seen in the sponge spaces*. The sponge disc medium stains faintly. (pleural fluid) (Reproduced from open access publication: Shidham VB. CytoJournal 2019;16:12)

- Comparison of the morphological details and quantitative enhancement by Micro NextGen CelBlokingTM kit (Micro-NGCB kit) (Metastatic adenocarcinoma, pleural fluid). a & b. Cell-block section with very scant cellularity (conventional random, indiscriminatory, plasma-thrombin method); c & d. Relatively cellular cell-block section with many diagnostic cells in the wells and in small spaces in the sponge disc (cell-block prepared with enhancement method- Micro-NGCB kit. (Reproduced from open access publication: Shidham VB. CytoJournal 2019;16:12)
HistoGel [Figure 7,15] or other non-proprietary gels such as gelatin,[57] albumin, or agar may be used for cell-blocks. The plasma-thrombin method [Figure 16] is another choice,[58,59] but it cannot be used if the specimen is submitted in fixative. The collodion method [Figure 17] is an additional choice, but interaction with picric acid step would compromise the immunoreactivity pattern.[60,61] Albumin, gelatin, or HistoGel can be used for both fixed and fresh specimens. Recently, ready to use Nano- and Micro- NextGen CelBlokingTM (NGCB) kits are available.[49-54] These kits have preformed media with wells and built-in AV marker[62] for guiding the histotechnologists while cutting the cell blocks and other benefits while immunohistochemical evaluation with SCIP approach [Figure 23].[68]
Specimens with significant proportion of blood contamination is recommended to be treated with ammonium chloride based erythrocyte lyzing agent such as BloodLyz.[55] This would prevent the interferences due to erythrocytes at various levels from preparation of cell-blocks with good cells in cell-block sections to immunostaining of blood-rich sections with tendency to fold and float during staining steps [Figure 19].
A large clot may be present in effusions without anticoagulant. Such a clot, especially if it has formed very soon after collection, may trap virtually all of the cells, including neoplastic cells, in the specimen, and lead to negative results on cytomorphologic evaluation without cell-block. Such false-negative results can be preempted by routine preparation of a cell-block. If the effusion fluid is collected in anticoagulant, then any neoplastic (and other) cells remain in the fluid and are not lost.
Cell-block sections may demonstrate certain histologic features helpful for final interpretation of a particular neoplasm such as papillary, acinar, duct-like formations, and psammoma bodies.[1,76-78] This is particularly valuable when evaluating peritoneal washings. It provides an opportunity to compare the histomorphology in tissue sections of the corresponding known primary neoplasm. Some of these structures in washings may not be sampled or may be difficult or impossible to interpret in cytology smears alone.
CYTOPATHOLOGY REPORT
The final cytopathology report on serous fluids is similar to cytopathology reports on other organ system with various areas as shown in sample report [Table 11]. Cytopathology terminology system which is applied for other organ system is also recommended for reporting serous fluid cytopathology findings.[60,61]
The terminologies used in the five-tier system is:
Non-diagnostic (ND)
Negative for malignancy (NM)
Atypia of undetermined significance (AUS)
Suspicious for malignancy (SFM)
Positive for malignancy (PM): primary and metastatic
Acknowledgment
Authors thank Farah Ahmad, MBBS, MPH (Research Assistant to Dr. Shidham, Wayne State University School of Medicine, Detroit, MI, USA) and Janavi Kolpekwar for copy-editing assistance.
ABBREVIATIONS (IN ALPHABETIC ORDER)
CMAS - CytoJournal Monograph and Atlas Series
DQ - Diff-Quik
DPX - mixture of distyrene, a plasticizer, and xylene
EDTA - Ethylenediaminetetraacetic acid
HA - hyaluronic acid
HE - hematoxylin and eosin
NGCB kits - NextGen CelBloking kits
LBC - liquid-based cytology
PAP – Papanicolaou
PBS - Phosphate buffer saline
RBCs - Red blood cells rpm - revolutions per minute
SCIP - subtractive coordinate immunoreactivity pattern
References
- Pleural, pericardial, and pericardial fluids In: Bibbo M, ed. Comprehensive Cytopathology (2nd edn). Philadelphia: WB Saunders; 1997. p. :551-621.
- [Google Scholar]
- Peritoneal washings In: Cibas ES, Ducatman BS, eds. Cytology-Diagnostic Principles and Clinical Correlates (2nd edn). Edinburgh: WB Saunders; 2003. p. :145-161.
- [Google Scholar]
- Society of gynecologic oncologists clinical practice committee statement on prophylactic salpingo-oophorectomy. Gynecol Oncol. 2005;98:179-81.
- [CrossRef] [PubMed] [Google Scholar]
- Peritoneal lavage cytology: An assessment of its value during prophylactic oophorectomy. Gynecol Oncol. 2002;85:397-403.
- [CrossRef] [PubMed] [Google Scholar]
- Cytologic features of atypical mesothelial cells in peritoneal dialysis fluid. Diagn Cytopathol. 1990;6:22-26.
- [CrossRef] [PubMed] [Google Scholar]
- Intraoperative pleural lavage: is it a valid prognostic factor in lung cancer? Ann Thorac Surg. 2005;79:254-257.
- [CrossRef] [PubMed] [Google Scholar]
- Pleural lavage cytology before and after lung resection in non-small cell lung cancer patients. Ann Thorac Surg. 2006;81:298-304.
- [CrossRef] [PubMed] [Google Scholar]
- Pleural lavage: a novel diagnostic approach for diagnosing exudative pleural effusion. Lung. 2000;178:371-379.
- [CrossRef] [PubMed] [Google Scholar]
- Pleural lavage cytology in esophageal cancer without pleural effusions: clinicopathologic analysis. Eur J Cardiothorac Surg. 2000;17:575-579.
- [CrossRef] [Google Scholar]
- Tumor cells in intraoperative pleural lavage. An indicator for the poor prognosis of bronchogenic carcinoma. Cancer. 1990;65:1801-1804.
- [CrossRef] [Google Scholar]
- Diagnosis of visceral pleural invasion by lung cancer using intraoperative touch cytology. Ann Thorac Surg. 2002;73:1552-1557.
- [CrossRef] [Google Scholar]
- Comparison of diaphragmatic wash and scrape specimens in staging of women with ovarian cancer. Gynecol Oncol. 2001;81:461-465.
- [CrossRef] [PubMed] [Google Scholar]
- Malignant Effusions: A Multimodal Approach to Cytologic Diagnosis. New York: Igaku-Shoin; 1994
- [CrossRef] [Google Scholar]
- Heparinized bottles for the collection of body cavity fluids in cytopathology. Am J Hosp Pharm. 1979;36:211-214.
- [CrossRef] [PubMed] [Google Scholar]
- Combined cytomorphologic and immunophenotypic analysis in the diagnostic workup of lymphomatous effusions. Acta Cytol. 2001;45:307-312.
- [CrossRef] [PubMed] [Google Scholar]
- BD SurePath™. https://www.bd.com/en-us/offerings/brands/surepath [Last visited 1/17/2022]
- [Google Scholar]
- Cytyc, ThinPrepTM Non-gyn. http://www.thinprep.com/lab/lab_thinprep_nongyn_fluids.shtml [Last visited 1/17/2022]
- [Google Scholar]
- Pleural, pericardial, and peritoneal fluids In: Cibas ES, Ducatman BS, eds. Cytology-Diagnostic Principles and Clinical Correlates (2nd edn). Edinburgh: WB Saunders; 2003. p. :119-144.
- [Google Scholar]
- Specimen collection In: Lewis SM, Coster JF, eds. Quality control in Haematology. London: Academic Press; 1975. p. :211.
- [Google Scholar]
- Liqui-PREPTM LGM International Inc 4350, Oakes Road, Fort Lauderdale, FL, 33314, USA. http://www.lgmintl.com (Long-term archival at: http://www.webcitation.org/query?id=96172)
- [Google Scholar]
- Manual method for liquid-based cytology: a demonstration using 1,000 gynecological cytologies collected directly to vial and prepared by a smear-slide technique. Diagn Cytopathol. 2001;25:334-338.
- [CrossRef] [PubMed] [Google Scholar]
- A method for concentrating cancer cells suspended in large quantities of fluid. Cancer. 1956;9:866-868.
- [CrossRef] [Google Scholar]
- Diagnostic cytopathology of ocular fluid specimens. Ophthalmology. 1984;91:726-749.
- [CrossRef] [Google Scholar]
- Cytology filter preparations: factors affecting their quality for study of circulating cancer cells in the blood. Acta Cytol. 1967;11:363373.
- [Google Scholar]
- Comparision of cellular recovery rates and morphologic detail obtained using membrane filter and cytocentrifuge techniques. Acta Cytol. 1976;20:174-180.
- [Google Scholar]
- Cytopreparatory techniques for eye fluid specimens obtained by viterectomy. Acta Cytol. 1982;26:551-560.
- [Google Scholar]
- Thermo Scientific™ Richard-Allan Scientific HistoGel™ Instructions for Use. https://tools.thermofisher.com/content/sfs/manuals/92957066-Richard-Allan-Scientific-HistoGel-Instructions-for-Use.pdf [Last visited on 2022 01 17]
- [Google Scholar]
- Hyluronic acid in pleural fluid associated with malignant tumor involving pleura and peritoneum. J Biol Chem. 1940;133:83-91.
- [CrossRef] [Google Scholar]
- Exfoliative cytology of primary and metastatic Wilms tumors. Acta Cytol. 1971;15:339-342.
- [Google Scholar]
- Acid mucopolysaccharide composition of serous effusions. Study of 100 patients with neoplastic and non-neoplastic conditions. Cancer. 1967;20:462-466.
- [CrossRef] [Google Scholar]
- Routine air drying of all the smears prepared during fine needle aspiration and intraoperative cytology studies: an opportunity to practice a unified protocol, offering the flexibility of choosing a variety of staining methods. Acta Cytol. 2001;45:60-68.
- [CrossRef] [PubMed] [Google Scholar]
- Shandon EZ Megafunnel™ with Shandon Cytospin®. http://www.thermo.com.cn/Resources/200802/productPDF_20937.pdf [Last visited 1/17/2022]
- [Google Scholar]
- Thyroid transcription factor-1 immunocytochemical staining of pleural fluid cytocentrifuge preparations for detection of small cell lung carcinoma. Acta Cytol. 2004;48:635-640.
- [CrossRef] [PubMed] [Google Scholar]
- Blood film preparation and staining procedures. Clin Lab Med. 2002;22(1):1-14 v.
- [CrossRef] [PubMed] [Google Scholar]
- Electron microscopic studies of cells in pleural and peritoneal effusions. Acta Cytol. 1973;17:401-409.
- [Google Scholar]
- Comparison of light and transmission electron microscopy for the evaluation of body cavity effusions. Acta Cytol. 1983;27:614-624.
- [Google Scholar]
- Electron microscopy In: Histotechnology-A Self Assessment Test. Chicago: ASCP Press, American Society of Clinical Pathology; 1997. p. :271-285.
- [Google Scholar]
- Individual specimen triage of effusion samples: an improvement in the standard of practice, or a waste of resources? Diagn Cytopathol. 2000;22:7-10.
- [CrossRef] [Google Scholar]
- The elimination of a 'ribbing' effect in cytologic smears. Am J Clin Pathol. 1958;30:143-144.
- [CrossRef] [PubMed] [Google Scholar]
- Specimen collection, handling, storage and variability In: Lewis SM, Koepke JA, eds. Hematology Laboratory Management and Practice. Oxford: Butterworth Heinemann; 1995.
- [Google Scholar]
- Fast drying of Fine Needle Aspiration slides using a hand held fan: impact on turn around time and staining quality. CytoJournal. 2006;3:12.
- [CrossRef] [PubMed] [Google Scholar]
- Nano and Micro Cell Block Discs after Tissue Processing Instructions to Histotechnologists. 2022. Available from: https://youtu.be/h2yuWg8H4pM [Last accessed on 2022 Jan 17]
- [Google Scholar]
- Processing of Single Specimen of Any Cellularity to Make a Cell Block with Nano Unit. 2022. Available from: https://youtu.be/y29SS1NwO_8 [Last accessed on 2022 Jan 17]
- [Google Scholar]
- Simultaneous Processing of Multiple Specimens of Any Cellularity to make Cell Blocks with Nano Units. 2022. Available from: https://youtu.be/ZPb0nq8MsLk [Last accessed on 2022 Jan 17]
- [Google Scholar]
- Processing of Single Sediment Rich Specimen at a Time to Make a Cell Block with Micro Unit. 2021. Available from: https://youtu.be/i-ZpXaljiIs [Last accessed on 2022 Jan 17]
- [Google Scholar]
- Simultaneous Processing of Multiple Concentrated Cellular Specimens (with Tissuecrit* More than 50%) for Making Cell Blocks with Micro Units. 2022. Available from: https://youtu.be/TRW5Vswy6J8 [Last accessed on 2022 Jan 17]
- [Google Scholar]
- Comparison of three commonly used cytologic preparations in effusion immunocytochemistry. Diagn Cytopathol. 2002;26:61-66.
- [CrossRef] [PubMed] [Google Scholar]
- Advanced Laboratory Methods in Histology and Pathology Washington, DC: Armed Forces Institute of Pathology, American Registry of Pathology; 1994.
- [Google Scholar]
- Compact cell blocks. Use for body fluids fine needle aspirations and endometrial brush biopsies. Acta Cytol. 1998;42:703-706.
- [CrossRef] [PubMed] [Google Scholar]
- Applications of plasma-thrombin cell-block in diagnostic cytology. Part II: Digestive and respiratory tracts breast and effusions. Pathol Annu. 1977;12 Pt 2:91-110.
- [Google Scholar]
- A celloidin bag for the histological preparation of cytologic material. J Clin Pathol. 1982;35:574-576.
- [CrossRef] [PubMed] [Google Scholar]
- Collodion Bag: a cell-block technique for enhanced cell collection. Lab Med. 1993;24(2):94-96.
- [CrossRef] [Google Scholar]
- (2009). Cell Block Preparation from Cytology Specimen with Predominance of Individually Scattered Cells. J Vis Exp (JoVE-Journal of Visualized Experiments) 2009 Jul 21;(29). pii: 1316. JoVE. ;29 Video article is available FREE on web as open access at http://www.jove.com/index/Details.stp?ID=1316
- [CrossRef] [PubMed] [Google Scholar]
- CellBlockistry: Chemistry and art of cell-block making-a detailed review of various historical options with recent advances. Cytojournal. 2019;16:12.
- [CrossRef] [PubMed] [Google Scholar]
- CellBlockistry: Science of Cell-block making as ancillary cytopathology component in the era of minimally invasive techniques with increasing role of molecular pathology (invited short communication) Clin Surg. 2019;4:2510.
- [Google Scholar]
- CellBlockistry 101 CytoJournal Monograph (CMAS) 2021. (1st ed). Grosse Ile: Cytopathology Foundation Inc.; Available from: https://www.amazon.com/-/es/vinod-shidham-ebook/dp/b098b65psl https://www.cytojournal.com/eissues
- [Google Scholar]
- Application of the international system for reporting serous fluid cytopathology (ISRSFC) on reporting pericardial effusion cytology. Acta Cytol. 2020;64:477-85.
- [CrossRef] [PubMed] [Google Scholar]
- The international system for reporting serous fluid cytopathology-diagnostic categories and clinical management. J Am Soc Cytopathol. 2020;9:469-77.
- [CrossRef] [PubMed] [Google Scholar]
- Serous Effusions: Reactive Benign and Malignant. In: Gray W, Kocjan G, eds. Diagnostic Cytopathology Vol Ch. 3. (3rd ed). Amsterdam, Netherlands: Elsevier;
- [Google Scholar]
- Cytopathologic Diagnosis of Serous Fluids Vol Ch. 15. (1st ed). Amsterdam, Netherlands: Elsevier, WB Saunders Company; 2007.
- [CrossRef] [Google Scholar]
- Nano Unit Depiction of Open Arrows on Large Upper Cap and Open Reverse (Anticlockwise) Arrows for Small Lower Cap. 2022. Available from: https://youtu.be/1OfzS1dC28w [Last accessed on 2022 Jan 17]
- [Google Scholar]
- How to Twist Open the Seal of Upper Large Cap of Nano Unit with Hand. 2022. Available from: https://youtu.be/hlsghRI6J5I [Last accessed on 2022 Jan 17]
- [Google Scholar]
- How to Open the Seal of Upper Large Cap of Nano Unit with Blunt Scalpel or Knife (if it Could not be Twist Broken with Hand) 2022. Available from: https://youtu.be/RIMN8IXh4s0 [Last accessed on 2022 Jan 17]
- [Google Scholar]
- How to retrieve 'Tissue Paper Covers' from its Envelop Pack. 2022. Available from: https://youtu.be/oZSY0-iAy7k [Last accessed on 2022 Jan 17]
- [Google Scholar]
- Scrape cell-block technique for fine needle aspiration cytology smears. Cytopathology. 2000;11:179-184.
- [CrossRef] [PubMed] [Google Scholar]
- Millipore filter cell-block preparation: an alternative to cell-block in nongynecologic specimens of limited cellularity. Diagn Cytopathol. 1999;20:389-392.
- [CrossRef] [Google Scholar]
- Endosalpingiosis in female peritoneal washings: a diagnostic pitfall. Int J Gynecol Pathol. 1987;6:340-346.
- [CrossRef] [PubMed] [Google Scholar]
- Mullerian inclusions in peritoneal washings. Potential source of error in cytologic diagnosis. Acta Cytol. 1986;30:271-276.
- [Google Scholar]
- Ectopic pancreas. A cause of false-positive peritoneal cytology. Acta Cytol. 1990;34:641-644.
- [Google Scholar]