

Translate this page into:
Screening and dotting virtual slides: A new challenge for cytotechnologists
-
Received: ,
Accepted: ,
This is an open-access article distributed under the terms of the Creative Commons Attribution-Noncommercial-Share Alike 3.0 Unported, which permits unrestricted use, distribution, and reproduction in any medium, provided the original work is properly cited.
This article was originally published by Medknow Publications & Media Pvt Ltd and was migrated to Scientific Scholar after the change of Publisher.
Abstract
Digital images are increasingly being used in cytopathology. Whole-slide imaging (WSI) is a digital imaging modality that uses computerized technology to scan and convert entire cytology glass slides into digital images that can be viewed on a digital display using the image viewer software. Digital image acquisition of cytology glass slides has improved significantly over the years due to the use of liquid-based preparations and advances in WSI scanning technology such as automatic multipoint pre-scan focus technology or z-stack scanning technology. Screening cytotechnologists are responsible for every cell that is present on an imaged slide. One of the challenges users have to overcome is to establish a technique to review systematically the entire imaged slide and to dot selected abnormal or significant findings. The scope of this article is to review the current user interface technology available for virtual slide navigation when screening digital slides in cytology. WSI scanner vendors provide tools, built into the image viewer software that allow for a more systematic navigation of the virtual slides, such as auto-panning, keyboard-controlled slide navigation and track map. Annotation tools can improve communication between the screener and the final reviewer or can be used for education. The tracking functionality allows recording of the WSI navigation process and provides a mechanism for confirmation of slide coverage by the screening cytotechnologist as well as a useful tool for quality assurance. As the WSI technology matures, additional features and tools to support navigation of a cytology virtual slide are anticipated.
Keywords
Digital imaging
image viewer
informatics
virtual slide navigation
virtual slide screening
whole slide imaging

INTRODUCTION
Digital images are increasingly being used in the field of cytopathology for telecytology, e-education, clinical consultation, web-based learning, quality assurance and secondary applications such as image analysis.[12345] Whole-slide imaging (WSI) is a digital imaging modality that uses computerized technology to scan and convert entire pathology or cytology glass slides into digital images (digital slides) that can be viewed on a computer monitor or on a mobile device (such as a tablet or smartphone) by using image viewer software or dedicated mobile applications.[67] Navigating the digital images mimics navigation of a glass slide on a light microscope, which allows users to scan from field to the field and increase or decrease (zoom in/out) the magnification. Therefore, this modality is also known as “virtual microscopy” defined as the simulation of microscopy on a computer monitor without the need of a microscope.[89]
Digital image acquisition of cytology glass slides has improved significantly over the years due to the use of liquid-based preparations and to advances in WSI scanning technology. Although automatic multipoint pre-scan focus technology provided improved scanning of one focal plane (X-Y axis), the most significant scanning technology improvement with a substantial impact on cytological specimens is the Z-axis (z-stack) scanning that generates multiple planes of focus at a user-set interval simulating the up-and-down focus of a conventional microscope [Figures 1 and 2].
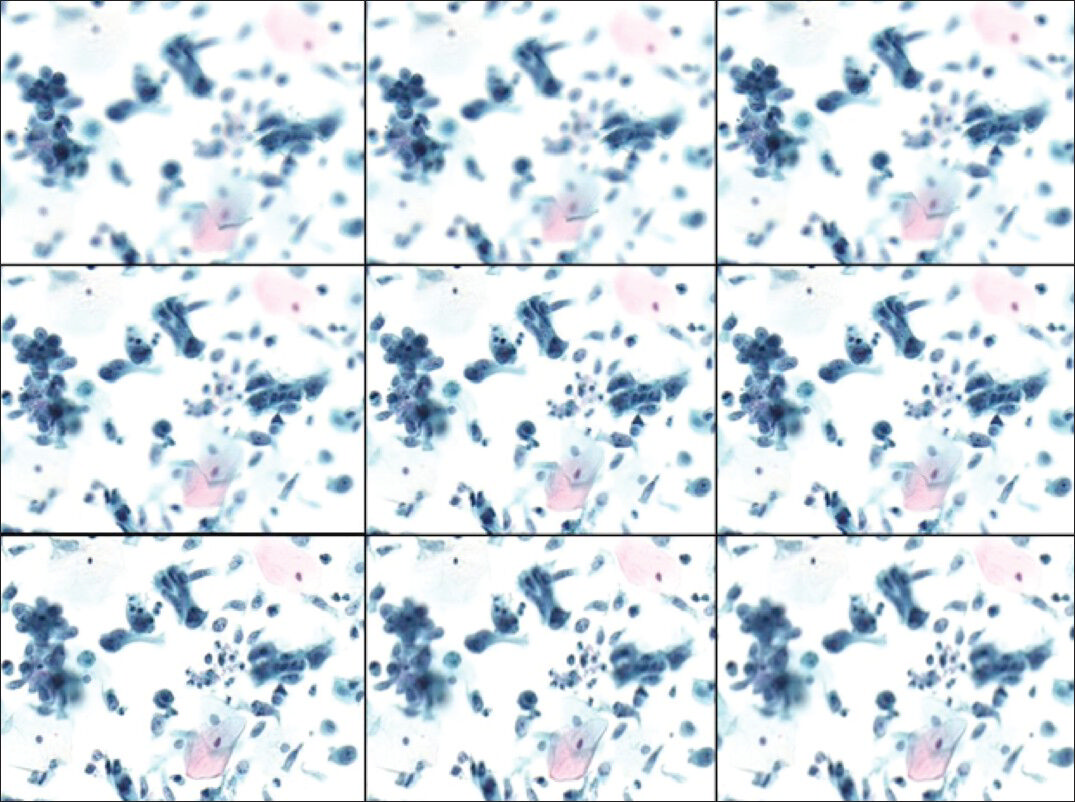
- SurePath Pap test of an endocervical adenocarcinoma case, illustrating multiplane focus capabilities. The slide was scanned using a Hamamatsu Nanozommer 2.0 HT scanner, with nine layers of one-micrometer interval settings. The slide size was 2.7 GB (Pap stain ×400)
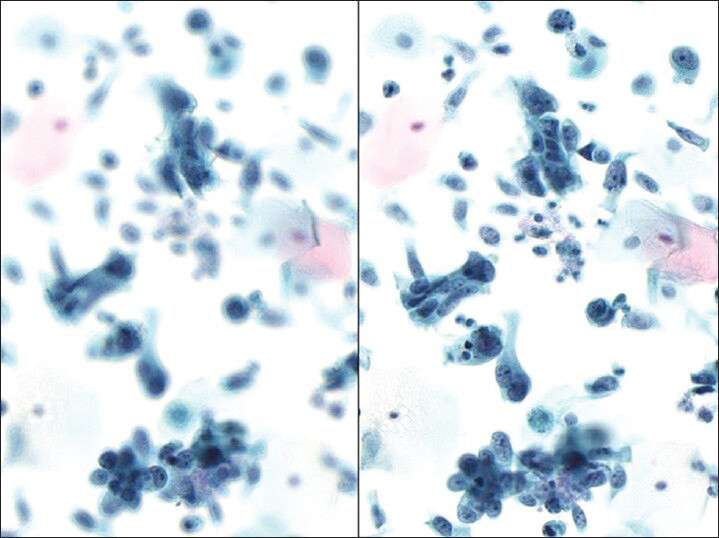
- Same case of an endocervical adenocarcinoma in SurePath Pap test from Figure 1, illustrating the actual differences of features that are being used for making a diagnosis when performing an up and down digital focusing at ×400 magnification
As with any cytologic glass slide, the screening cytotechnologist or cytologist is responsible for every cell that is present on an imaged slide. WSI is a new technology for many cytotechnologists. The first challenge the user must overcome is establishing a technique for systematically reviewing the entire imaged slide and dotting selected abnormal or significant findings. The scope of this article is to review current user interface technology available for virtual slide navigation that can be used while screening digital slides in cytology.
One of the most used whole slide image viewer, Aperio's Image Scope allows users to navigate a virtual slide in a number of ways:
-
Auto panning [Figure 3] is a convenient feature. By right clicking anywhere on the image, one can choose the auto pan feature. Once selected, two diamond signs appear; one is a negative image as seen in the picture, while the other is a solid image. Users can set the speed with which the slide will be panned and the direction in which it will be moved by adjusting the distance and direction of the solid diamond image in regards to the negative diamond image.
-
Another navigational method involves moving the cursor to any edge of the image. This causes a directional arrow to appear [Figure 4]. Once the arrow is visible, pressing and holding the right mouse button moves the image in the direction of the arrow. In addition, users can simply drag and pull the image using the left mouse button.
-
The most systematic navigational option requires the use of a keyboard. Holding the “shift” key simultaneously with any directional arrow advances the image one tile or field of view at a time [Figure 5]. Once the user has developed a method of navigating through the slide, the tracking feature can aid with the confirmation and documentation of the digital slide coverage.
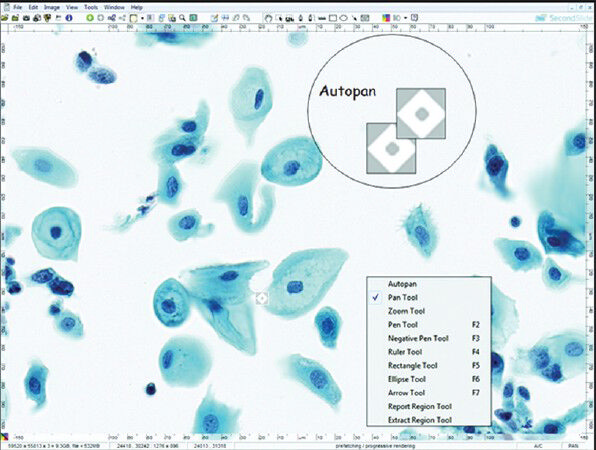
- Auto panning function in Aperio's Image Scope viewer. By right clicking anywhere on the image, one can choose the auto pan feature. Once selected, two diamond signs appear (see the circle); a negative image, as seen in the picture and a solid image. Users can determine the speed with which the slide is being panned and the direction in which it is moved, by adjusting the distance and direction of the solid diamond image versus the negative diamond image

- Image navigation method. Moving the cursor to any edge of the image causes a directional arrow to appear (small circle). Once the arrow is visible, pressing and holding the right mouse button moves the image in the direction of the arrow. In addition, users can simply drag and pull the image using the mouse
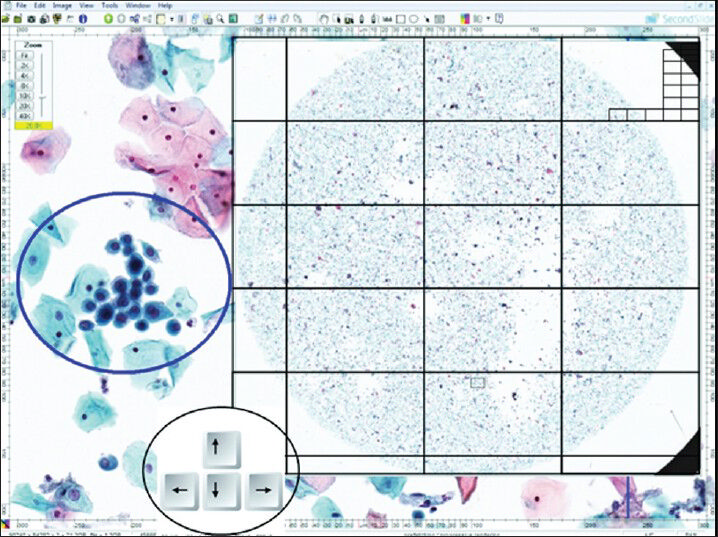
- Virtual slide systematic navigation option by using the keyboard (small circle) in Image Scope viewer. When holding the “shift” key along with any directional arrow, the image advances one tile or field of view at a time. The tracking feature can also be used to help users verify coverage of the entire digital slide
The Aperio's Image Scope tracker capability is a valuable feature [Figure 6]. It allows reviewers to feel confident that they have covered all areas of the slide. It can also be useful for quality assurance purposes because it provides a permanent record of what areas of the slide were viewed.[1011] To use the tracking feature, users need to choose the tracker option under the “View” menu of the Aperio Image Scope software. This brings up the tracker tool. At this point, users can open the WSI file, hit the record button of the tracker tool and begin recording their movements on the slide. The thumbnail, usually located in the upper-right-hand corner of the slide, allows users to identify the areas they have covered on a track map. The color of areas already screened changes from grey to white while the intensity of the grey is proportional to the magnification at which that area was screened. The higher the slide viewing magnification, the brighter color the tracker map will be. A tracking history can be saved at any point during the screening process under the annotations tab. These track maps are very useful tools to help users pick up where they left off when screening was interrupted. Once a track is completed, it can be saved for future review purposes.
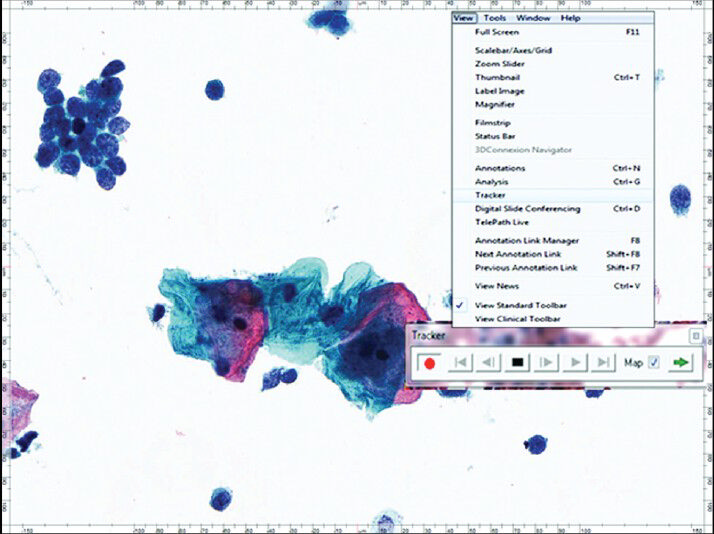
- Image Scope viewer tracker capabilities. To use the tracking feature, choose the tracker option under the “View” menu. This brings up the tracker tool prior to opening the virtual slide. Once the virtual slide is opened, pushing the record (red circle) button on the tracker tool begins recording the movements on the slide. Using the thumbnail in the upper-right-hand corner of the slide, users can watch the areas they have covered turn from grey to white. The intensity of the white coloring is proportional to the magnification at which an area was screened. The track can be saved at any point during screening under the annotations tab. For interrupted screening, these tracks are a tool to help users pick up where they left off. Once a track is completed, it can be saved for future review purposes
WSI allows for annotations or dotting to be made and saved with any image. An unlimited number of annotations can be used in a variety of colors [Figure 7]. From the toolbar, users can select a number of marking tools such as rectangle, ellipse, arrow or a freehand pen tool. Once an area has been marked, text can be added under the annotations tab to describe what exactly is being marked. This is a valuable tool that can be used by screeners to communicate findings to the final reviewer.[12] It can also be used as an educational tool, providing teachers with a built-in testing mechanism.[13] When needed, annotations can be hidden and they can be revealed on demand. Layers (annotations) are saved in a small size file called XML that is usually concealed.

- Whole-slide imaging annotations/dotting. An unlimited number of annotations can be used in a variety of colors. From the toolbar, the user can select a number of marking tools: the rectangle tool, ellipse tool, an arrow tool, or a freehand pen tool. Once an area has been marked, text can be added under the annotations tab to describe what exactly is being marked. The layers (annotations) are saved in a small file called XML
Simultaneous slide review is another interesting feature of Image Scope software. This function allows users to open two or more cases at the same time, side-by-side. It is particularly useful when one wants to display and compare multiple features of an entity side by side; for example, the intra-cytoplasmic vacuoles and pigmented cytoplasm characteristic of malignant melanoma. This feature is also useful for reviewing histology (Hemotoxylin and eosin slide) with cytology or immunohistochemistry stained slides simultaneously. In addition, this feature can permit users to compare benign versus malignant entities, or squamous versus glandular lesions, for teaching purposes [Figure 8]. To use this feature, users simply need to open the cases of interest and select tile horizontal or vertical under the “Windows” tab. Both cases open side-by-side, at which point they can be reviewed independently or synchronously. To view the cases synchronously, users need to establish a starting point on each case and then click the “Manual Synchronize” tab on the toolbar. Once this feature is activated, any navigational movement or changes in magnification will be applied to both images, simultaneously.
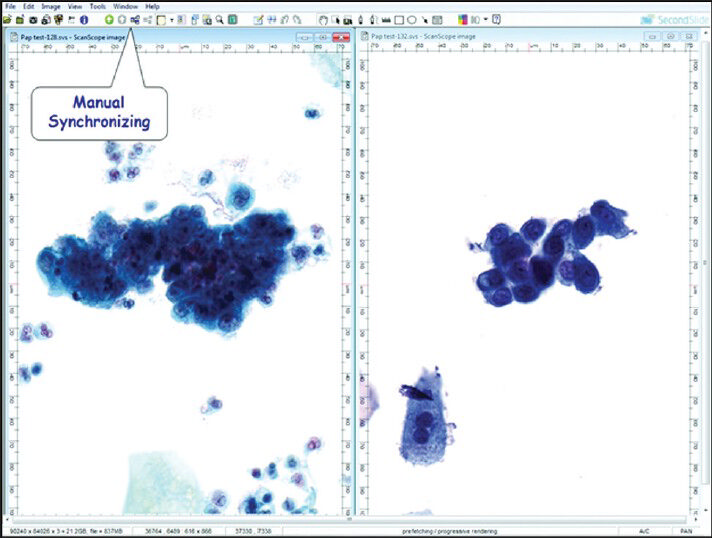
- Simultaneous slide review using Image Scope viewer. After opening the cases of interest, selecting tile horizontal or vertical under the “Windows” tab opens both cases side- by-side. This way they can be reviewed independently or synchronously. To view the cases synchronously, the user needs to establish a starting point on each case and then click the “Manual Synchronize” tab on the toolbar. Once this feature is activated, any navigational movement or changes in magnification will be applied to both images
CONCLUSION
When screening or reviewing cytology cases in a WSI format, cytotechnologists or cytologists must establish a technique to review systematically the entire imaged slide and to dot selected abnormal or significant findings. Nowadays WSI scanner vendors provide tools built into the image viewer software, such as keyboard controlled navigation and tracking map, which allow for a better virtual slide navigation experience. Annotation tools can improve communication between the screener and the final reviewer or can be used for education. The tracking functionality allows recording of the WSI navigation process and provides a mechanism for confirmation of slide coverage by the screening cytotechnologist, as well as a useful tool for quality assurance.
As the WSI technology matures, additional features and tools to support navigation of a cytology virtual slide are anticipated.
COMPETING INTERESTS STATEMENT BY ALL AUTHORS
The authors declare that they have no competing interests.
AUTHORSHIP STATEMENT BY ALL AUTHORS
All authors of this article declare that we qualify for authorship as defined by ICMJE http://www.icmje.org/#author.
Each author has participated sufficiently in the work and takes public responsibility for appropriate portions of the content of this article.
Each author acknowledges that this final version was read and approved.
ETHICS STATEMENT BY ALL AUTHORS
This manuscript is a review in form of a methodology article. Therefore IRB approval was not mandatory.
EDITORIAL/PEER-REVIEW STATEMENT
To ensure the integrity and highest quality of CytoJournal publications, the review process of this manuscript was conducted under a double-blind model (authors are blinded for reviewers and vice versa) through automatic online system.
Available FREE in open access from: http://www.cytojournal.com/text.asp?2013/10/1/22/120790
REFERENCES
- Telecytology and its evolving role in cytopathology. Diagn Cytopathol. 2012;40:498-502.
- [Google Scholar]
- Experience with multimodality telepathology at the university of Pittsburgh medical center. J Pathol Inform. 2012;3:45.
- [Google Scholar]
- Digital imaging in pathology – Current applications and challenges. J Biophotonics. 2012;5:327-35.
- [Google Scholar]
- Telecytology: Clinical applications, current challenges, and future benefits. J Pathol Inform. 2011;2:51.
- [Google Scholar]
- Digital imaging in pathology: Whole-slide imaging and beyond. Annu Rev Pathol. 2013;8:331-59.
- [Google Scholar]
- Virtual microscopy: High resolution digital photomicrography as a tool for light microscopy simulation. Hum Pathol. 1999;30:477-83.
- [Google Scholar]
- Informatics for practicing anatomical pathologists: Marking a new era in pathology practice. Mod Pathol. 2010;23:349-58.
- [Google Scholar]
- Digital images and the future of digital pathology. J Pathol Inform. 2010;1 pii: 15
- [Google Scholar]
- Virtual microscopy and digital cytology: State of the art. Ann Ist Super Sanita. 2010;46:115-22.
- [Google Scholar]
- Digital pathology: Exploring its applications in diagnostic surgical pathology practice. Pathology. 2010;42:512-8.
- [Google Scholar]